SpaceControl
3D Input Devices
User Manual
3D Input Devices
User Manual
Copyright © 2009-2018 by SpaceControl GmbH & Co.
KG, Germany
21 August 2018
Contents |
gehe zur deutschen Version |
- Contents
- 1 Introduction
- 2 The Devices
- 3 The Software
- 3.1 Installation and Uninstallation
- 3.2 Starting Driver and SpaceControl Panel
- 3.3 SpaceControl Panel Application
- 3.4 Loading And Saving Configurations
- 3.5 Remote Control of Applications Over the Network
- 3.6 The C++ Application Programming Interface
- 3.7 The Java Application Programming Interface
- 4 Troubleshooting
- 5 Technical Data
- 6 System Requirements
- 7 Change Log
- 8 Known Bugs
- 9 Trademarks
1 Introduction
3D input devices like the SpaceController are working similarly as a mouse and are used for manipulating objects on a computer screen. There are two degrees of freedom in conventional mouse movement: the directions up/down and left/right. In contrast to this our 3D mice have six degrees of freedom: translation in all three axes of space (x, y, z) and rotation around all of these axes. Therefore they are the ideal equipment for moving and rotating objects in virtual 3D environments like CAD applications or moving the camera e. g. in Google Earth.The 3D input devices are delivered with a driver software. Both are described in this manual.
2 The Devices
2.1 Usage
Our 3D mice are devices predominantly developed for CAD professionals. The common task in computer aided design is to move an object into the correct position and work on it with some tools. The same is in the real world: Imagine you want to peel a potato. You will take the potato in your left hand and peel it with a knife in your right (assuming you are right handed ...). Also in the computer world you will move an object with the left hand (using the SpaceController) and work on it with your right (using your normal mouse).Therefore, the SpaceController is especially designed for the left hand. So, place the device on the left side of your keyboard and hold your hand as shown below:
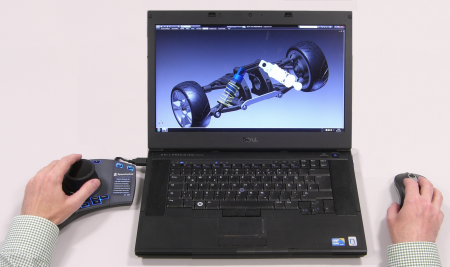 Fig. 2.1: The
SpaceController is handled most ergonomically
with the left hand |
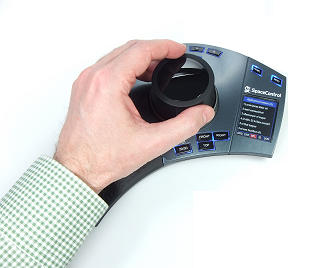 Fig. 2.2: Optimal hand position |
Of course the SpaceController can be handled with the right hand as well: The control software is able to activate a special Right Hand Mode; the display and the cap's orientation are adjusted to the right hand then. Only the key arrangement lacks in ergnomy a little in this case of course. See below for details.
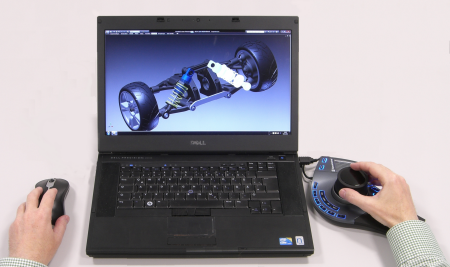 Fig. 2.3: Handling in Right Hand Mode |
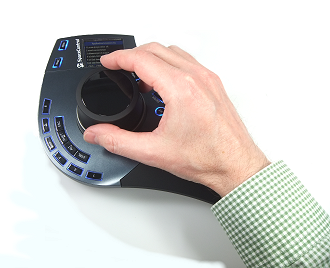 Fig. 2.4: Hand position when handled with the right hand |
2.2 Control Elements
The SpaceController's control elements are shown in the next picture:
Fig. 2.5: The SpaceController's control elements
2.2.1 Cap and Wheel
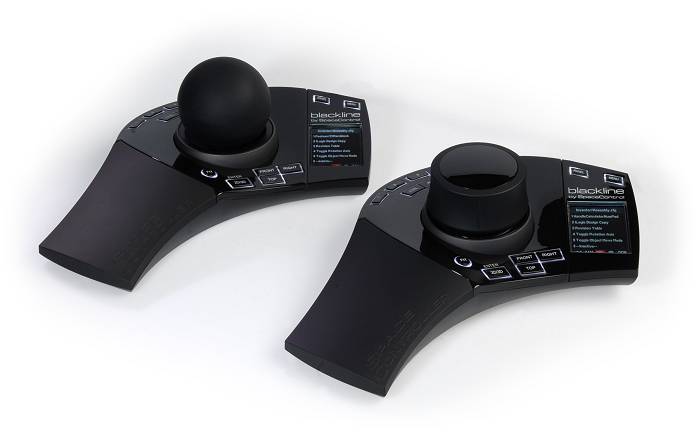
The cap is the most important control element. You can move and rotate it some millimeters in each direction, and an object on the screen will do the same. Try it with the SpaceControl Panel's cube demo (see below).Some people prefer a ball instead of a cap. You can order the SpaceController in both configurations:
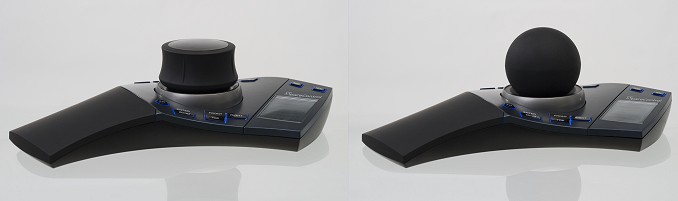
Fig.2.6: SpaceController in cap and ball configuration
The silver or grey wheel is placed below the cap and is used for navigating in the SpaceController's menu. Furthermore, it is programmable, and you can assign a function to it by yourself.
2.2.2 Keys
The keys are arranged in an ergonomical way; you will see that the important keys are in optimal range for most people. If you would like to have your most used keys at another position - no problem: All keys (with exception of the MENU key and the PANEL key) can be redefined (see below).The keys are:
- Function Keys:
These keys are meant to be redefined by the user. The current
assignment is shown on the display.
- Shift Keys: These keys do the same as the corresponding keys on your keyboard.
- Panel Key: The panel key opens the SpaceControl Panel. With the panel you can configure the device (see chapter 3.3).
- Menu Key: When the menu key is pressed the device switches into the so called menu mode (see section 2.2.4). In this mode you can adjust some of the device's parameters, without the need to open the SpaceControl Panel.
- View Keys: If your application (or the belonging plug-in) supports it you can rotate an object into the front, top or right position.
- 2D/3D, Enter Key: In standard mode this key turns the rotation off ("2D mode") and on ("3D mode"). In menu mode it is used as the enter key to confirm a selection you made in the menu.
- Fit Key: If your
application (or the belonging plug-in) supports it you can
move an object so it fills the screen completely.
2.2.3 Display
The display is divided into three parts:
|
 Fig. 2.7: The display in standard mode |
2.2.4 Modes
The SpaceController can be in standard mode or menu mode. In standard mode you can read off the five operating states ORG, CAM, WFL, 2D and DOM from the display and the LED illumination.- Normal operation is done in standard mode. You can move the cap and press the keys, and these events are transmitted to connected applications. The display shows the standard screen, i. e. the assignment actually chosen for the function keys (see fig. 2.7).
-
- ORG: The SpaceController provides several move modes (s. below). You can rotate a scene e. g. around the focal point (middle of the screen window) or around the scene's origin. In the second case the field ORG is highlighted in red.
- CAM: The cap may move the scene or the camera looking at the scene. In camera mode the field CAM is illuminated in red.
- WFL: The silver or grey wheel beneath the cap can be used for different tasks. If it is configured for the Wheel Function Launcher (s. below) the field WFL is red.
- 2D: If the device is in 2D mode only translation data is
transmitted, rotation data is suppressed. In this state
the 2D/3D key is illuminated in red and the display's 2D
field is highlighted:
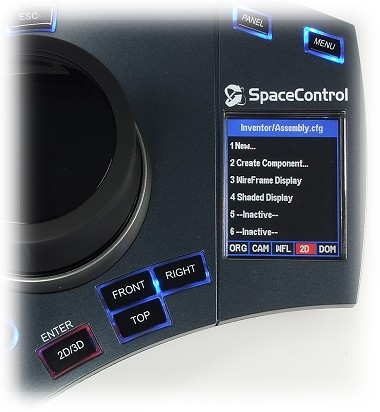
Fig. 2.8: 2D mode: 2D/3D key illuminated and 2D field in display highlighted
- DOM: If the device is in dominant mode the device checks
which of the cap's six axes is elongated most. Only the
data of this axis will be transmitted, all others will be
suppressed. This is useful especially if you are a
beginner to avoid confusion when moving objects. In this
mode the DOM field in the display is highlighted.
- In menu mode all
keys but the MENU key and ENTER key are inoperative. To
symbolize this state all blue LEDs are shut off and the MENU
key and the ENTER key are illuminated in green. (The 2D/3D key
operates as an Enter key in this state and does not change
from 3D into 2D mode).
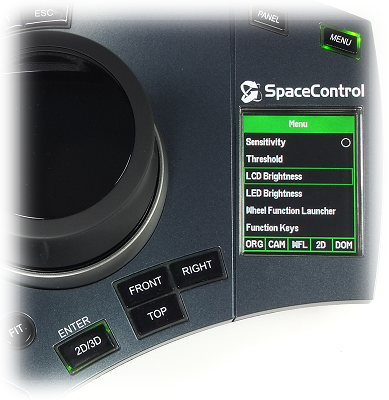
Fig. 2.9: Menu mode: MENU and ENTER key and the menu itself are green illuminated
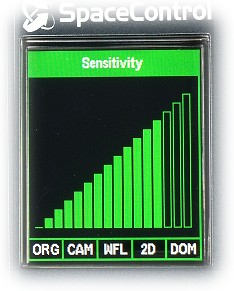
Fig. 2.10: Adjusting sensitivity
The menu is shown in green, and you can adjust the sensitivity, the threshold, the LCD's and the LED's brightness. To change a setting move the wheel to the element you want and press the enter key. The display will show a bar graph, move the wheel again to change the value.
Eventually the user has connected one of these parameters directly with the wheel so you can adjust this parameter with the wheel without activating the menu mode. In this case the display shows a little circle behind the parameter (in fig. 2.9, the wheel controls e. g. the sensitivity). Only in order to show this the last two lines "Wheel Function Launcher" and "Function Keys" are displayed here; you can not select them.
To leave the menu mode press the menu key again or wait some seconds.
3 The Software
The software consists of a driver (responsible for the communication between the device and user applications), the SpaceControl Panel (for configuring the device), some demo applications and APIs for programming in C++ and Java. Furthermore, there are some plug-ins for better integration of user applications into the driver's functionality.3.1 Installation and Uninstallation
3.1.1 Windows®
3.1.1.1 Installation
All software components are bundled in a single installation file "SpaceControl_Driver_xxx_Win32_64_setup.exe", where xxx stands for the actual version no., e. g. "SpaceControl_Driver_280_Win32_64_setup.exe" is the setup file version 2.8.0. The installation is easy:- Double click the file to start the installer.
- To save disk space you can deselect not wanted plug-ins (see below) .
- Choose an appropriate installation folder if you want to change the default one.
Please, plug in the SpaceController device when asked and start the driver afterwards. If the driver is started before, it will complain about a missing DLL ("ftd2xx.dll") which is copied when the device is plugged in. In rare cases it might be necessary to unplug the device and plug it in again to establish the communication between device and computer.
The installer searches in the Windows Registry for the applications we have a plug-in for. Therefore you should install our driver after you have installed these applications; otherwise the installer cannot detect them and cannot make the needed changes.
The installer is able to run in "silent" mode, i. e. there is no user interaction necessary. For doing this run the installer with parameters "/S" (enables silent mode), "/D" (choosing the installation directory) and /P=<list of wanted plug-ins>. Example:
SpaceControl_Driver_280_Win32_64_setup.exe /S /D=C:\myProgs\SpaceControl /P=Inventor;Solid Edge;Universal
will install the software with the plug-ins for Inventor and Solid Edge and the Universal Plug-in in folder "C:\myProgs\SpaceControl" without asking any questions.
The following names for the plug-ins are allowed:
- 3ds Max
- AutoCAD
- Blender
- Catia
- Creo
- GstarCAD
- Inventor
- NX
- ProEngineer WF2
- ProEngineer WF3
- ProEngineer WF4
- ProEngineer WF5
- Solid Edge
- SolidWorks
- Universal
- Videos
3.1.1.2 Deinstallation
The uninstaller knows the parameter "/S" as well. Additionally you can give it the option "/UF=delete"; only in this case all the user folders "SpaceController" will be deleted. Otherwise they are preserved:sc_uninst.exe /S /UF=delete
3.1.2 Linux®
3.1.2.1 Installation
All software components are bundled in a single installation file "SpaceControl_Driver_xxx_LNXyy_setup.sh", where "xxx" stands for the actual version number and "yy" for the bit width; e. g. "SpaceControl_Driver_281_LNX64_setup.sh" is the setup file version 2.8.1, 64 bit. The installation is easy:- Copy the file into an arbitrary folder (a new temporary
folder "SpaceControl" will be created there and moved to
"/opt/" in the end).
- Make sure that the installation file is executable. If not,
change its access rights with your file browser or navigate to
the file in a terminal window and enter there:
chmod u+x SpaceControl_Driver_281_LNX64_setup.sh - Open a terminal, start the file and follow the instructions.
Do the installation as normal user, not as root, because the
installer starts the driver at the end of the process and
would create the configuration files in the root's home folder
then; that is not wanted normally.
- Dependent on the Linux distribution it may be necessary to
reboot the system before the device will be detected by the
driver.
- After installation the installation file is not necessary any longer, and you may delete it.
- For uninstalling the software start the script "uninstall"
in the just created folder "/opt/SpaceControl/".
SpaceControl_Driver_281_Win32_64_setup.sh -- -s -p "Blender;Maya;NX"
will install the software without any questions with the plug-ins for Blender, Maya and NX. The options are case-sensitive!
For the time being there is only a plug-in for Blender. If you want to prevent it from being installed add to the parameter "-p" some arbitrary string instead of "Blender".
3.1.2.2 Deinstallation
The uninstaller is located in "/opt/SpaceControl/":/opt/SpaceControl/uninstall -s
Parameter "-s" must only be added if the silent mode (i. e. no questions) is wanted.
3.1.3 macOS®
All software components are bundled in a single installation file "SpaceControl_Driver_xxx_OSX64_setup.dmg", where xxx stands for the actual version number; e. g. "SpaceControl_Driver_280_OSX64_setup.dmg" is the setup file version 2.8.0. There is only a driver for 64 bit yet. The installation is easy:- Double click on the file, it is mounted in the operating system and its content is shown in a Finder window.
- Double click the icon "Double click to install ...". The software will be unpacked; root access is necessary to copy a file; enter the password when asked so.
- For starting the driver and the user interface click on the icon "SpaceControl Panel" in the Launchpad.
- For uninstalling the software start the script "uninstall" in the just created folder "/Applications/SpaceControl/".
3.1.4 Plug-ins
Some applications are better integrated than others, i. e., the driver is aware of their menu structure, and the user can map the application's menu items to the device's keys (see the Function Assignment dialog for details). To achieve this an additional piece of software - a plug-in - is to be installed. The plug-ins are integrated in the installer file and can be selected for installation there. With the appropriate entries in the Windows start menu they can be deinstalled individually or installed later with the installer any time.The following plug-ins are available (the links to the readme files will only work if the plug-in is installed):
| Plug-in\Betriebssystem |
Windows |
Linux |
macOS |
|---|---|---|---|
| 3ds Max | + |
- |
- |
| AutoCAD | + |
- |
- |
| Blender | + |
+ | + |
| Catia | + |
- | - |
| Creo | + |
- |
- |
| GstarCAD | + |
- |
- |
| Inventor | + |
- |
- |
| NX | + |
- |
- |
| ProEngineer WF2 | + |
- |
- |
| ProEngineer WF3 | + |
- |
- |
| ProEngineer WF4 | + |
- |
- |
| ProE-WF5/Creo | + |
- |
- |
| Solid Edge | + |
- |
- |
| SolidWorks | + |
- |
- |
| Universal | + |
- |
+ |
The Universal Plug-in is a special case: It is used to connect not to one single application only but to many applications implementing an established 3D controller interface (see the readme file for an application list). The plug-in is not able to read out the menu items therefore. They must be mapped to the device's keys by keyboard macros if needed; the same is with the keys Front, Right, Top and Fit.
3.2 Starting Driver and SpaceControl Panel
Start the driver by clicking on the menu item Start Driver in your desktop's start menu or by executing "sc_daemon" or "sc_daemon.exe" in the installation folder. Maybe your firewall strikes its bell because of an internet connection initiated by the SpaceControl software. This is because the software handles its interprocess communication via TCP/IP (the same protocol is used by the internet); in fact the SpaceControl software will not connect to the internet (unless for showing the help videos on the dialogs). So, please allow your firewall to let pass the SpaceControl software's requests.If the driver is started the first time it will create a folder "SpaceController" in the user's home directory, containing some configuration files. Depending on the operating system it will be created in folder
- "C:\Documents and Settings\<Username>\" (Windows XP),
- "C:\Users\<Username>\" (Windows 7 to Windows 10),
- "/home/users/<Username>/" (Linux) or
- "/Users/<Username>/" (macOS).
The SpaceControl Panel is started in the same way by clicking the "SpaceControl/Control Panel" menu item in the start menu. If a SpaceController is connected to the computer it will start up with the window shown in figure 3.1.
3.3 SpaceControl Panel Application
The SpaceControl Panel application is used to configure the device. Its window consists of the common components used in windowed applications, i.e. a menu bar, buttons and other control elements: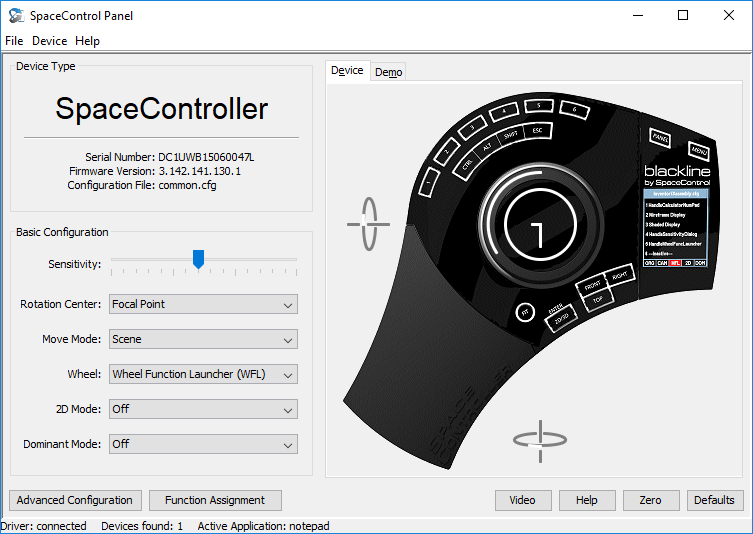
Fig. 3.1: SpaceControl Panel window
In the upper left corner you see the Device Type sub-panel showing the device type and the device's Serial Number. This information is only important if you have more than one device connected to your computer (you can connect up to four devices). Each device has its own set of configuration data which is stored in a separate folder with the same name as the serial number. This folder may contain several configuration files. Which configuration file is actually loaded can be seen beside the label Configuration File: In fig. 3.1, the configuration file is e. g. "common.cfg". See chapter 3.4 for details.
The next sub-panel shows the so called Basic Configuration. Here you can modify the most important parameters as the cap's sensitivity, the move mode or the wheel's assignment. See section 3.3.1 for details. For special requirements you may configure further advanced settings.
The area on the right shows the device you are just configuring (if you have more than one device connected to your computer you can switch between the devices by selecting them with the Device menu in the menu bar). A displacement of the cap is visualized by white bars and arcs drawn over the device's image. Another visualization is given with the Demo tab. There you can move a colored cube and see the system's reaction on your configurations immediately:

Fig. 3.2: The built-in Cube Demo
In the base line there are these six buttons:
- Advanced Configuration
Opens the Advanced Configuration dialog (see below).
- Function Assignment
Opens the dialog for configuring the keys, the Wheel Function Launcher and special assignments for the cap (see below).
- Video
Shows a short help video with explanations for this dialog.
- Help
Opens the manual in chapter 3.3 (this is here).
- Zero
Defines the actual cap displacement as the zero value. The driver will send no data to the applications if the cap is in this position again and not stronger displaced than the threshold (see below).
- Defaults
Sets all values to the default values which build a reasonable set of parameters for most applications. Attention: Also the key configurations and all recorded macros are deleted.
3.3.1 Basic Configuration
The Basic Configurations shown in figure 3.1 are as follows:
|
 Fig. 3.3: Display when
adjusting sensitivity
|
- 2D Mode
This can be set to On or Off. If set to On all the cap's rotation data is suppressed. It is needed in some applications to avoid an unwanted rotation of a drawing for example.
- Dominant Mode
This can be set to On or Off. If set to On the driver looks which of the six coordinates x, y, z, a, b or c currently has the highest value at this moment. Only this component is transmitted, all others are set to 0. This mode is useful if you want to be sure that your object to be manipulated will not be moved in directions you are not interested in. As an example try the Roboter Demo application.
3.3.2 Advanced Configuration
The Advanced Configuration dialog is basically divided into four sub-panels for Translation and Rotation data, Modifiers and Move Mode. It allows configuration in more detail than can be done in the Basic Configuration.
Fig. 3.4: Advanced Configuration
dialog
The elements of the Translation and Rotation sub-panels are arranged as a table consisting of three lines; each line lets you adjust the settings for one of the translational coordinates x, y, z or the rotational components around the corresponding axis. Figure 3.4 shows the tables in their ground state. The tables can be expanded by clicking on Activate Remapping and Activate Mouse Movement in the Modifiers panel. If these check boxes (and Further Settings) are activated the dialog looks as shown in figure 3.5:

Fig. 3.5: Advanced Configuration dialog, Remapping, Mouse Movement and Further Settings activated
The table elements are as follows:
- On/Off
This column lets you activate or deactivate the sending of a single data component.
- Sensitivity
The sensitivity of a single data component can be adjusted here. This sensitivity is added to the global sensitivity you can configure on the Basic Configuration sub-panel. I. e. you reach the minimal/maximal sensitivity only when both sliders - the corresponding slider here and the slider on the Basic Configuration sub-panel - are set to minimum/maximum.
If the Connect Sensitivity Sliders checkbox is activated all three sliders are moved simultaneously.
- Reversed
If this check box is activated the components data is multiplied by -1. For instance, if you move the cap to the left side your object will move to the right side. Some applications need this setting to work correctly (e. g. Google Earth).
- Remap To
This combo box allows you to redefine an axis. If you remap e. g. the x translation to the y translation, your object will move up and down instead of left and right when displacing the cap in x direction. This is also needed for certain applications (e. g. Google Earth).
- Mouse
Pointer
It is possible to connect the cap displacement with the movement of the mouse pointer. Example: Connect the x translation with the Horizontal mouse movement and the z translation with the Vertical. Now you can move the mouse with the cap when displacing it forward/backward or left/right. (Hint: Connect the predefined "PressLeftMouseButton" command (see there) with the y-down translation and you can even click on objects with the cap. See chapter 3.3.3.6 for details.)
If the Restore Mouse Position checkbox is activated the driver stores the current mouse position before the cap is displaced and sets it back when the cap is released again.
With the Absolute Mouse Coordinates checkbox activated the mouse pointer is set to the center of your screen if the cap is released. Moving the cap causes the pointer to move proportionally in the corresponding direction and to move back when releasing the cap again.
Attention: As soon as mouse pointer movement is activated no cap data is sent to the applications anymore.
- Move
Mode:
This parameter adjusts the mode of moving and the rotation center. Basically you can change between scene mode and camera mode.
In scene mode the cap moves pretendedly the scene; i. e., pushing the cap to front causes the objects to move away, they will appear smaller (in truth always the camera is moved of course, not the scene).
In camera mode the cap moves the camera looking at the scene; i. e., pushing the cap to front causes the camera to move into the scene, and objects will therefore appear bigger.
The following modes are available:- Scene Mode: Rotate around Focal Point: We are in object mode, and the center of rotation is the point the camera is looking at (i. e. the window's midpoint).
- Scene Mode: Rotate around Origin: We are in scene mode, and the center of rotation is the scene coordinate system's origin.
- Camera Mode: Rotate around Camera: We are in camera mode, the cap moves therefore the camera looking on the scene, and the camera is the center of rotation.
- Camera Mode: Rotate around Focal Point: The cap moves the camera, but the center of rotation is the point the camera is looking at (i. e. the window's midpoint).
All move modes can be modified by two additional settings:
- Lock Horizon : If this field is checked the camera is in its movement restricted in such a way, that the horizon can not be rotated. This simplifies the movement especially with camera flights.
- Hover: In this mode the camera movement is restricted, so that a translation can not modify the distance between the camera and the x-z-plane. It results in a kind of "helicopter" flight in camera mode.
- Right
Hand Mode:
The SpaceController is designed especially for the left hand (for right handers who hold there normal mouse still in the right hand). Of course the SpaceController can be handled with the right hand too, if you turn it around 90 degrees so that the wrist rest is in the correct position (see fig. 2.3 and 2.4). The cap's orientation must be adjusted then 90 degrees in the opposite direction. This is accomplished by activating the check box Right Hand Mode. Besides that, the display is rotated.
- Cap Data
Here you can adjust the way the cap's data is sent to the applications:
-
- Threshold
You have to displace the cap over a minimal threshold before the driver will start sending data. This threshold can be adjusted here.
This is useful to avoid unwanted movement of objects, e. g. if your device is pressed in a carry case for transportation over a longer period: It will last some time until the springs in the device have gained their original position. Increase the threshold if you see the driver is sending unwanted data. - Averaging
Because of random fluctuations in power consumption etc. the data delivered by the cap may oscillate a little over time. To avoid moving an object even if the cap is not moved you can set the threshold to an appropriate value (see above). However, the cap will have better responsiveness with a threshold of 0. Another way to cure this unwanted movement is to average some data received by the cap. You can adjust here how many data packets are used for the averaging process from 0 (or 1 = no averaging) to 15 (the last 15 data packets will be used for averaging). Set the number of packets used for averaging to the smallest value where you see no oscillation anymore as there is a disadvantage in using this mechanism: You will see a slight time lag if the Send Gap is set to higher values at the same time. - Send Gap
The Send Gap slider is used to reduce the data rate with which the device will produce its output. Figure 3.5 shows a setting of 30 ms. This means the Controller will send a data packet with translational and rotational data every 30 ms to the foreground application. Some applications are not able to receive and handle the data with high data rates. If you observe a visual delay in your application set the Send Gap to to higher values.
If the slider is moved to its upmost position (> 400) no cap data will be sent at all.
- Threshold
- Brightness
With the two sliders the Display's and the blue LEDs' brightness can be adjusted. While the sliders are moved blue bars are displayed on the LCD.
Hint: The state of the check boxes Connect All Sensitivity Sliders is not part of the configuration, but a property of the GUI. It will not be saved with the configuration.
3.3.3 Function Assignment (Key Configuration)
The Function Assignment dialog is used to connect the device's keys, the wheel, the Wheel Function Launcher and the cap with predefined functions or user defined macros (i. e. recorded keystroke sequences).3.3.3.1 Assigning Functions to Keys
Figure 3.6 shows the Function Assignment dialog in its ground state. On the left side there is the list of available functions, sorted into a tree structure, on the right side you see the list of the device's keys a function can be applied to. A function can be assigned to a key by dragging it with the mouse from the left side to the key.Each key can hold two functions: A function of the second level can be triggered by double pressing the key. Or you exchange the two levels with each other by executing the function SwitchKeyShiftLevel (it is assigned to the device key 6 by default). To configure the two shift levels you change between them with the tabs Single Press and Double Press.

Fig. 3.6: Function Assignment dialog
For the sake of clarity we distinguish between:
- Device functions:
These are functions related to devices, especially to the
SpaceController of course, but also to the normal mouse or a
joystick. For instance, the function SetZero does the same as the Zero button on the main
dialog. You will find below a
list of all device functions available.

Fig. 3.7: Function Assignment dialog, device functions expanded
- User functions:
These functions can be modified by the user and are sequences
of keystrokes which you can record with a small keystroke
recorder (see below).
Additionally there are three functions Execute Application x and Load Configuration x resp.; with the first group you can execute arbitrary applications just by a keypress, with the second you can load configurations.

Fig. 3.8: Function Assignment dialog, user functions expanded
- Application functions:
This branch of functions is only there if an application is in
the foreground to which a plug-in exists supporting this
feature. The functions listed in this branch mirror more or
less the application's menu structure and do the same as the
application's menu items do. So, by dragging it to a function
key you can activate an application's menu item by pushing the
function key:

Fig. 3.9: Function Assignment, application functions expanded
Figure 3.9 shows the application functions list using the example of Autodesk Inventor®. What you can see here depends mainly on the capabilities of the application's API: Some applications give full access to their menu structure as you can see here. Others will only provide a plain list of all functions available or no functions at all. Our plug-ins try to do the best, but be prepared to see less information than shown in Fig. 3.9.
The configuration of the six device keys numbered from 1 to 6 is displayed in the device's LCD. If you are not interested in this information you can show the actual date and time instead when activating the check box Display Clock Instead of Functions.
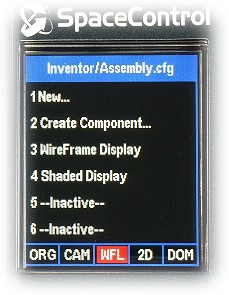 Fig. 3.10: Display showing the function keys' functions |
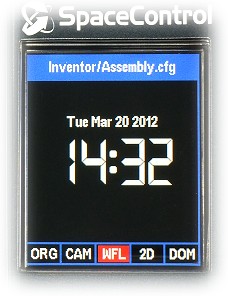 Fig. 3.11: Display showing the clock |
3.3.3.2 Defining User Functions (Macros)
To define a user function (i. e. a sequence of keystrokes on your computer keyboard to be applied to a device key) proceed as follows:- In the Key Configuration
dialog's functions list scroll down to one of the entries
"User_Function_00", "User_Function_01" etc. and press the Edit button. The Function Editor will
appear:

Fig. 3.12: Function Editor
- Give your function a meaningful name in the Function Name edit field,
e. g. "my_first_own_function" as shown above.
- Place the cursor into the Keystrokes
field and start typing your keystroke sequence by pressing the
corresponding keys on the keyboard.
There are some special commands which can not be recorded in this way:
- Back : Since the backspace key will be recorded as any other key rather than doing its usual task you will need to press the Back button to correct errors.
- Clear : You may clear the whole edit field by pressing the Clear button.
- Device Key: Pressing a SpaceController key can be simulated here: Choose the wanted key from the list. In this way the keys can be combined, and the maximal number of allowed key presses can be extended.
- Device Function: In this list you will find all SpaceController device functions. You can drag them to a key as described above or record them here as a macro. With the latter method you can even combine more than one function on one key.
- Other
Key or Function: Here are four special functions
listed:
- Tabulator: To record a Tab you have to use this function because the tab key on your keyboard will move the focus instead of being recorded.
- Insert Left Mouse Click: Similarly you have to use this function to insert a left mouse click because it moves the cursor in the edit field and therefore can not be recorded directly.
- Insert Delay: This function inserts a delay of 100 ms into your macro. Some applications may not react to the command without such a delay; e. g. it may last some time until a dialog is opened completely in which you want to make more inputs with the macro.
- Execute only in case of state change:
- If the macro is assigned to a cap deflection (s. section 3.3.3.6): In this case its result is that the macro is only triggered if the corresponding cap deflection changes and not (as without the function) as long as the deflection persists. So this function does the same as the checkbox Send Function only in Case of Cap Changes, but in difference to this not for all cap deflections but only for those the macro is assigned to.
- If the macro is assigned to a key: In this case all "key pressed" events in the macro are sent into the operating system when the device key is pressed, and all "key released" events are sent when the device key is released. Without this function in the macro all "pressed" and "released" events are sent when the key is pressed, and no event is sent when the key is released.
- Reset : This button also clears the edit field but resets the function name additionally to its default value.
- Leave the dialog with OK .
- Once defined you can apply your function to a key by dragging it to the key's selection field as described above.
- In The Function
Assignment dialog you can copy a user function to the
clipboard with the button Copy; it can be pasted then
to another user function with the button Paste. When
using the common short cut "Ctrl-c" and "Ctrl-v" for this
press the Ctrl key and release it not until "c" or "v" is
pressed and released!
This is not what is wanted if your function consists of e. g. "<SHIFT><shift>" only, i. e. of pressing and releasing one of the keyboard's shift keys. In this case you may want to send the "key pressed" event when the device key is pressed and the "key released" event when the key is released, and not both events immediately after each other, since you otherwise could not input upper case letters while holding down the device key.
Therefore the following rule is implemented:
- If your function consists only of "Shift" keys (these are the keys Ctrl, Alt, Shift and Esc by definition), the sequence is filtered and all "key pressed" events are sent into the operating system when the device key is pressed, and all "key released" events are sent when the device key is released.
- If your function contains at least one "No Shift" key, the
sequence is sent completely into the operating system when the
device key is pressed and nothing will be sent when the key is
released again. Unless your macro contains the function Execute
only in case of state change (s. above); in this case
the behaviour is the same as with the shift keys.
If you know the ASCII code of the wanted character you can record it as a combination of the Alt key and the number block. The ASCII code of character "#" is 35 e. g. So, hold the Alt key pressed, type "3" and "5" on the number block and release the Alt key.
Remark 2: Be aware to record your keyboard sequences exactly as you would type it in your application. Most applications allow to store a document with the keyboard short cut "Ctrl S" for example. This means "press down the 'Ctrl' key (and hold it!), press the 's' key, release the 's' key and release the 'Ctrl' key". This sequence should be displayed in the function editor as
"<CTRL><S><s><ctrl>" ( correct).
It is a common mistake to release the 'Ctrl' key immediately and to press the 's' key afterwards; this would result in the sequence
"<CTRL><ctrl><S><s>" ( wrong).
This is wrong and sends effectively only the 's' key to your application.
Remark 3: To avoid unexpected closing of the dialog when recording e. g. the sequence <Alt><O><o><alt> there are no button shortcuts (e. g. <Alt><O> for the OK button) in this dialog. If you want to operate it without your mouse use the TAB key to move between the buttons.
3.3.3.3 Assigning Functions to Special Keys
On your device you can see not only the six dedicated function keys but also the special keys used for common tasks in an application, as Ctrl, Shift, 2D/3D etc. It is possible to redefine these keys in the same way as described above when clicking on the Show Function to Special Key Assignment check box. If this is done additional fields with the special keys will appear:
Fig. 3.13: Function Assignment dialog with activated Special Key configuration
- Below the Function Keys you see the Shift Keys; these accomplish the same as the keys with the same name on your keyboard.
- The View Keys have a special meaning in some CAD applications: They are used to realign an object you are handling into the given direction. If the check box Perform Automatic Fit is activated an additional fitting to the application's window size is performed.
- The Other
Keys are:
- Fit adjusts the size of the scene to the size of the window.
- 2D/3D enables and disables the transmission of rotational data.
3.3.3.4 Assigning Functions to the Wheel
The silver or grey wheel beneath the cap is - as already mentioned - freely configurable. After activating the check box Show Wheel Assignment you can assign arbitrary functions to the wheel:
Fig. 3.14: Function Assignment dialog
with activated Wheel
Assignment
Now it is possible to drag functions to the left and/or right wheel direction. The functions may be different - as shown above -, or the same function can be assigned to both directions.
If both directions trigger the function HandleWheelGestures (this is done in the main dialog) by selecting Gesture Detection in the drop down list Wheel) the greyed area Gestures will become available, and the wheel is able to detect six different gestures. You can assign a function to the gesture "wheel right + wheel left" for example.
3.3.3.5 Assigning Functions to the Wheel Function Launcher
If the six function keys are not enough you can assign up to 28 functions to the so-called Wheel Function Launcher. This is a little dialog box allowing you to trigger a desired function with the wheel (see below). The functions can be assigned if the check box Show Function to WFL Assignment is activated:
Fig. 3.15: Function Assignment dialog with activated WFL Assignment configuration
As usual you can drag a function to one of the 28 WFL slots.
3.3.3.6 Assigning Functions to the Cap
You can apply your functions not only to the device's keys but even to the cap: A function is triggered when the cap is displaced in the appropriate way. To activate this mechanism click on the Activate Function to Cap Assignment check box. The Function Assignment dialog will become extended and allows you to apply two functions to each cap displacement. The first function is triggered by a low, the second by a high cap displacement.
Fig. 3.16: Function Assignment dialog with activated Cap Assignment
In figure 3.16 you can see a typical configuration used for shooter games: When using the keyboard you move your game character with the w, a, s and d keys forward, backward and sideways. Therefore, create four user functions "w", "a", "s" and "d" (the name does not matter of course) and record the keystrokes w, a, s and d to the corresponding function. Then drag these functions to the cap's combo boxes as shown above. A slight forward movement of the cap will now move your character forward, for a sideward movement you must push the cap a little stronger since the cap movement "x translation right - low" is not active. Crawl and jump may be applied to the high y translations.
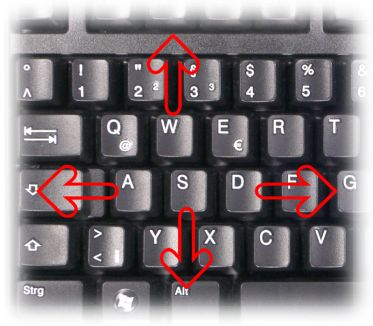 Fig. 3.17: W, A, S and D are the common control keys in shooter games |
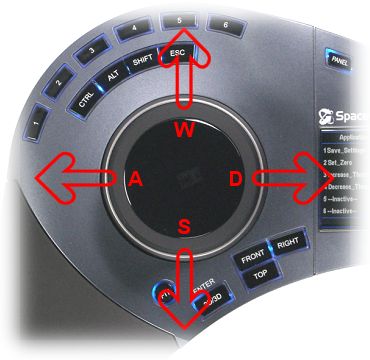
Fig. 3.18: Mapping W, A, S and D to the cap allows movement of characters with the SpaceController |
Send Function Only in Case of Cap Changes should be activated here. If this setting is not activated the device will send e. g. "press key w", "release key w", "press key w", "release key w" etc. as long as the cap's displacement persists. This is not appropriate for a shooter game because a key is released immediately after it is pressed. As a result there is no movement of the character at all! If the check box is activated the key press event is normally fired when the cap is displaced (to the low/high extent respectively), but the release event is fired only if the cap changes its state, i. e. leaves the (low or high) region again.
The complete configuration for a 3D shooter game we have described in a video.
The Defaults button resets all keys to its default values (i. e. all cap functions to "-- Inactive --" and the device key functions to the function printed on the key). However, the functions you recorded with the keystroke editor are not cleared. Press the main window's Defaults button if you want to achieve this.
3.3.3.7 Device Functions
In the Function Assignment dialog there are device functions for the devices- SpaceControl,
- Mouse and
- Joystick.
Each function can be assigned to the keys, the wheel, the Wheel Function Launcher and/or the cap as described above. The following functions are presently defined:
| Group/Function Name | Description |
|---|---|
| Devices | Group of the device functions. |
| +-SpaceControl | Group of functions related to the SpaceControl devices.
|
| | +-Panel | Group of functions for the buttons of the SpaceControl
Panel's main dialog. |
| | | +-SetZero |
This function does the same as a click on button Zero
in the main dialog. |
| | | +-ResetSettingsToLastSave |
This function resets all configuration parameters to
the values when the configuration has been saved the last
time. Attention: The values are stored automatically as
soon as the foreground application changes. |
| | | `-Save |
This function does the same as the menu item "File/Save Configuration". |
| | +-MoveMode* | Group of functions related to the cap's move mode. |
| | | +-ToggleSceneCameraMode |
Toggles between scene and camera move mode. |
| | | +-ToggleScreenOriginRotation |
Toggles the rotation center between the screen's midpoint and the worlds origin. See move mode. |
| | | +-ToggleLockHorizon |
Does the same as the homonymous setting in dialog Advanced Configuration. |
| | | `-ToggleHover | Does the same as the homonymous setting in dialog Advanced Configuration. |
| | +-Settings | Some further SpaceController settings. |
| | | +-ToggleTranslation |
Switches translation data on and off. |
| | | +-ToggleRotation |
Switches rotation data on and off. |
| | | +-ToggleDominantMode |
Switches dominant mode on and off. |
| | | +-ToggleDeviceLights |
Switches all blue LEDs on and off. |
| | | +-ToggleRightHandMode |
Switches right hand mode on and off. |
| | | +-IncreaseSensitivity |
Increases the cap's sensitivity by one step. |
| | | +-DecreaseSensitivity | Decreases the cap's sensitivity by one step. |
| | | +-IncreaseThreshold | Increases the threshold by one step. |
| | | +-DecreaseThreshold | Decreases the threshold by one step. |
| | | +-IncreaseLCD'sBrightness | Increases the LCD's brightness by one step. |
| | | +-DecreaseLCD'sBrightness | Decreases the LCD's brightness by one step. |
| | | +-IncreaseLEDs'Brightness | Increases the LEDs' brightness by one step. |
| | | `-DecreaseLEDs'Brightness | Decreases the LEDs' brightness by one step. |
| | +-Keys | Group of all the SpaceController's special keys. |
| | | +-Ctrl |
Simulates pressing the keyboard's Ctrl key. |
| | | +-Alt | Simulates pressing the keyboard's Alt key. |
| | | +-Shift |
Simulates pressing one of the keyboard's Shift keys. |
| | | +-Esc |
Simulates pressing the keyboard's Esc key. |
| | | +-Front |
Moves the scene to front view (if supported). |
| | | +-Right |
Moves the scene to right side view (if supported). |
| | | +-Top |
Moves the scene to top view (if supported). |
| | | +-Fit |
Zooms the scene to full screen size. |
| | | +-2D/3D |
Switches rotation data on and off. |
| | | `-Panel |
Opens the SpaceControl
Panel. |
| | +-Wheel | Group of functions related to the wheel. |
| | | +-SetWheelToSensitivity |
Configures the wheel to control the sensitivity. |
| | | +-SetWheelToThreshold | Configures the wheel to control the threshold. |
| | | +-SetWheelToLCD'sBrightness | Configures the wheel to control the LCD's brightness. |
| | | +-SetWheelToLEDs'Brightness | Configures the wheel to control the LEDs' brightness. |
| | | +-SetWheelToWheelFncLauncher |
Configures the wheel to open the Wheel Function Launcher. |
| | | +-SetWheelToWheelGestures | Configures the wheel to detect wheel gestures. |
| | | +-SetWheelToFunctionKeys | Configures the wheel to trigger a function key. |
| | | +-HandleSensitivityDialog |
Opens a slider dialog for adjusting the sensitivity. |
| | | +-HandleThresholdDialog | Opens a slider dialog for adjusting the threshold. |
| | | +-HandleLCD'sBrgtnssDialog | Opens a slider dialog for adjusting the LCD's brightness. |
| | | +-HandleLEDs'BrgtnssDialog | Opens a slider dialog for adjusting the LEDs brightness. |
| | | +-HandleWheelFuncLauncher | Opens the Wheel
Function Launcher. |
| | | +-HandleWheelGestures | Detects wheel gestures. The function can only be connected to the Wheel Assignment in the Function Assignment dialog, not to the function keys, the WFL or the cap; it can only be assigned by the drop down list Wheel in the main dialog, not by drag and drop in the Function Assignment dialog. The function is working only if both fields in Wheel Assignment are connected with the same function and not only one field. |
| | | `-HandleFunctionKeys | Handles
function keys. The function can only be connected to the Wheel Assignment in the Function Assignment dialog, not to the function keys, the WFL or the cap; it can only be assigned by the drop down list Wheel in the main dialog, not by drag and drop in the Function Assignment dialog. The function is working only if both fields in Wheel Assignment are connected with the same function and not only one field. |
| | `-Others |
Group with further functions. |
| > | +-HandleCalculatorNumPad | Opens the virtual numpad and the calculator. |
| | +-SwitchKeyShiftLevel | Exchanges the two key shift levels with each other
(single press/double press). |
| | +-Back | Moves the scene to back view (if supported). |
| | +-Left | Moves the scene to left view (if supported). |
| | +-Bottom | Moves the scene to bottom view (if supported). |
| | +-ReservedFunction_5 |
Reserved. |
| | +-... | Reserved. |
| | `-ReservedFunction_9 | Reserved. |
| +-Mouse | Group with functions related to the normal mouse. |
| | +-PressLeftMouseButton
|
Simulates a click with the left mouse button. |
| | +-PressMidMouseButton | Simulates a click with the mid mouse button. |
| | +-PressRightMouseButton | Simulates a click with the right mouse button. |
| | +-MoveMouseWheelUp |
Simulates moving the mouse wheel up. |
| | `-MoveMouseWheelDown | Simulates moving the mouse wheel down. |
| `-Joystick |
Group with functions related to the joystick. |
| +-JoystickXAxis
|
Simulates moving the joystick's x-Axis. |
| +-JoystickYAxis
|
Simulates moving the joystick's y-Axis. |
| +-JoystickZAxis
|
Simulates moving the joystick's z-Axis. |
| +-JoystickRAxis
|
Simulates moving the joystick's r-Axis. |
| +-JoystickUAxis
|
Simulates moving the joystick's u-Axis. |
| +-JoystickVAxis
|
Simulates moving the joystick's v-Axis. |
| +-JoystickPOV
|
Simulates moving the joystick's cooliehat. |
| `-JoystickBut
|
Simulates pressing one of the joystick's buttons. |
*: The move mode is not supported by all applications or plug-ins resp.
Hint: All functions printed in grey color are not implemented yet and can not be used.
3.3.4 The Wheel Function Launcher (WFL)
With the Wheel Function Launcher (WFL) the wheel's functionality can be considerably extended. Up to 28 arbitrary functions (device functions, user functions and/or application functions) can be triggered comfortably with the wheel this way.3.3.4.1 Using the Wheel Function Launcher
When the wheel is configured appropriately the WFL will be displayed on the screen as soon as the wheel is moved:
Fig. 3.18: The Wheel Function Launcher
You see basically a list of functions, scrollable with the wheel. Fig. 3.18 shows amongst others the application functions "Wireframe Display" and "Shaded Display" in the list.
A function can be triggered in four ways:
- Double click the function with the mouse,
- press the device's CTRL key,
- press the button Trigger or
- the WFL does this by itself when the Autotrigger Delay is not set to Infinite. In Fig. 3.18, the function "Wireframe Display" would be triggered after 900 ms without further wheel movement.
The meaning of the checkboxes is:
- If Cyclic Scrolling is activated the blue marker jumps to the first position after the last position is reached and vice versa.
- If Accelerated Scrolling is activated the blue marker moves overproportional faster on quick wheel movements.
- If Close When Function is Triggered is activated the WFL will automatically close after triggering the function.
3.3.4.2 Configuring the Wheel Function Launcher
The WFL will work as expected only if it is configured correctly. Two steps are necessary. First: The wheel must be configured to open the WFL. This is done by activating the appropriate element in the drop down list in the SpaceControl Panel's main dialog:
Fig. 3.19: Wheel configuration to open the WFL
The WFL will appear now when moving the wheel, but it will contain only some pre-configured functions. Your own functions must be assigned in the second step in the Function Assignment dialog (as shown above). See the example for fig. 3.18 here again:

Fig. 3.20: Configuring the WFL
The entries "Wireframe Display" and "Shaded Display" are functions of the CAD application Autodesk Inventor; both have been dragged from the function list to the WFL slots as shown above.
The Wheel Assignment must be set to HandleWheelFuncLauncher, this has been done by the first step already.
After these two configuration steps the WFL will appear with an extended function list, and if the Autotrigger Delay is set it will trigger a function automatically when it is chosen.
3.3.5 Calculator and Number Pad
In dialog Function Assignment you find in the branch "Functions/Devices/SpaceController/Others/" the function HandleCalculatorNumPad. Like all the other functions it can be dragged to a key, the WFL or the wheel. When the function is triggered the dialog Calculator/Number Pad is shown: 
Fig. 3.21: Integrated calculator |
 Fig. 3.22: Integrated number pad |
The number pad is used to put the characters on it into the foreground application's input fields if they have the focus. You do not need to let go your normal mouse for doing that in this way.
The same is possible with the calculator: When pushing the Send button the display is sent to the foreground application. The calculator provides the usual basic calculations and shows the following special characteristics:
Percent:
The "%" key converts the displayed number from a percentage to a decimal. When the key is pressed after an arithmetic operation, addon, discount and percentage can be computed as follows:
- "+ n % =": Adds n percent to the displayed number.
- "- n % =": Subtracts n percent from the displayed number.
- "* n % =": Multiplies the displayed number by n percent.
- "/ n % =": Divides the displayed number by n percent.
- How much are 1000 plus 25 percent?: "1000 + 25 % =" results in 1250.
- How much are 1000 minus 25 percent?: "1000 - 25 % =" results in 750.
- How much are 25 percent from 1000?: "1000 * 25 % =" results in 250.
- From how much are 1000 25 percent?: "1000 / 25 % =" results in 4000.
The calculator provides a memory, usable with the following keys:
- STO: Copies the number displayed into the memory.
- RCL: Copies the memory into the display.
- SUM: Adds the number displayed to the memory.
- EXC: Swaps the memory and display.
The three check boxes in the dialog's lower part have the following meaning:
- Add CR when pressing 'Send'
This function is available only in the calculator mode; it modifies the Send button's behaviour slightly: If activated it sends not only the calculator's display's content to the foreground application but a carriage return character (CR) additionally. In many applications you can close an open input in this way. - Use '.' as Decimal Separator
If activated a decimal point is sent to the foreground application instead of a decimal comma. Some applications need the one or the other. - Close Automatically
Normally an input in progress will be closed by a carriage return character in an application, and you do not need the Number Pad any more. If activated the dialog will be closed when a carriage return character has been sent.
3.3.6 Menu Bar
The menu bar allows you to load and save the configuration files for the connected devices, set your preferences, choose one of the connected devices for configuration and to open these help pages.
Fig. 3.23: Menu Bar
3.3.6.1 File Menu
- Load Configuration
.../Save Configuration/Save Configuration As ...:
These items can be used to store and restore the device's configuration parameters to/from harddisk. The parameters are those presented in the Basic Settings sub-panel, the Advanced Configuration dialog and the Function Assignment dialog.
- Start Driver/Stop Driver:
If the connection between the driver and the SpaceControl Panel is not established the panel assumes that the driver is not running and you can start the driver here. If there is a connection the menu item is greyed to prevent a second start of the driver. As the item says Stop Driver is used to stop the driver.
- Autostart Driver When
User Logs In:
This is a toggle menu item. If checked the driver will be started automatically as soon as the user logs in.
- Preferences:
If activated the Preferences dialog will appear:

-
- The Help Browser section lets you choose your favourite Web browser for displaying the help pages. If Use Default Browser is checked your operating system's default browser is used, if not you can search for another one and put its path into the Browser path field.
- The user interface's language can be set with the Language section. If Default is activated the SpaceControl Panel will open in the language your desktop is in. Attention: The panel must be restarted to make the setting active.
- The Look And Feel
section allows the selection of your favourite SpaceControl Panel's
skin. The list is generated automatically out of the
proposel delivered by the Java Runtime Environment and depends on
the operating system.
- The section Others
assembles some more preferences:
- If Start Driver
with Panel is checked the SpaceControl Panel
will start the driver automatically when started if it
is not already running.
- If Ask Before Exit is checked the SpaceControl Panel presents a message box before leaving the application.
- If Readjust Dialog Size on Device Change is checked the SpaceControl Panel's window adjusts its size when the user changes the device with an item of the Device menu. This is used to restore the default window size in case the user has changed it.
- If Show Cap Data as Graphic is checked you see the white bars and arcs when moving the cap as shown in fig. 3.1.
- If Show Cap Data as Digits is checked the numerical values of the sent data are shown below the device's picture.
- If Show Tooltips is checked short help texts are displayed when the mouse cursor rests over a dialog's control element.
- If Show "Tip of
the Day" is checked a little hint is
displayed when the SpaceControl
Panel is started.
- If Start Driver
with Panel is checked the SpaceControl Panel
will start the driver automatically when started if it
is not already running.
- Update
Firmware ...:
The SpaceController device contains three microcontrollers with their own software and a RAM chip with data for the display, which is together called firmware. From time to time we will publish firmware versions on our web site, downloadable as files.
Clicking the menu item will show the Firmware Update dialog:

Fig. 3.25: Firmware Update dialog
For updating perform these two steps:
- Click on the Select button and choose the firmware file.
- Click on Start Update to load the new firmware into the device. This will last some minutes, the four bars in the dialog's lower area will show the progress.
Update the firmware with the newest driver version generally if no other hint is given.
- Exit:
Leaves the SpaceControl Panel and saves the preferences and the Control Panel's window size and position.
3.3.6.2 Device Menu
With the Device menu you can change the device for configuration if there is more than one device connected to the computer. Each connected device will be shown here as a new menu item. To distinguish the different devices the device's serial number is shown here and in the Device Type sub-panel of the main window (see fig. 3.1).If the Readjust Dialog Size on Device Change checkbox in the Preferences dialog (see fig. 3.24) is activated the main window's size is adjusted to the device picture when the device is changed. This is used to restore the window's default size in case the user has changed it.
3.3.6.3 Help Menu
If menu item User Manual is selected these help pages are opened in the Web browser you have selected in the Preferences dialog (see fig. 3.24).Menu item About opens the usual About dialog box containing version information, copyright notice, license and system information. These data may be important if you need support in case of trouble with the driver
3.4 Loading And Saving Configurations
3.4.1 All Applications
The SpaceControl driver monitors the desktop and checks which application is in the foreground. If there is a special configuration for the foreground application the driver loads this configuration and sets all of the device's parameters to the values stored in it as soon as the application comes into the foreground. Always when a configuration will be loaded the actual configuration is stored automatically at first, without any user interaction. Notably it is not necessary to execute the menu items "File/Save Settings" or "File/Save Settings As ..."What is a "special configuration" now? As mentioned above all configurations are stored as configuration files (with file extension ".cfg") in a folder "SpaceController" in the user's home directory (i. e. "C:\Users\<user name>\SpaceController\devices\<device's serial number>\"). The driver checks for the name of the foreground application, appends the extension ".cfg" to the name and tries to load this configuration file. If there is no file with this name it loads always the file "common.cfg". Which file is actually loaded you can see in the SpaceController's main window in the Device Type sub-panel beside the label Configuration File (see fig. 3.1) and on the device's LCD in the title line (see fig. 2.7).
Now the problem arises what the name of an application is. That is not always easy to determine - the driver tries to use the binary name seen in the operating system's process list. In case this is known not to work (e. g. all Java applications have the same binary name "java.exe") it uses the application window's title; of course this may be ambiguous too ...
Fortunately the SpaceControl Panel tells you what the driver thinks the foreground application's name is: In the status bar you can see the entry Active Application; e. g. in fig. 3.1, its value is "notepad". If you want to have a special configuration for the notepad application just save a file "notepad.cfg" in the device's configuration file folder. The panel will propose this name automatically when activating the menu item "File/Save Settings As ...". Once this file is created the driver will always load it when an application called "notepad" comes into the foreground.
3.4.2 Supported Applications
The mechanism for loading configurations described in the previous chapter works for all applications. But some applications are better tied to the SpaceController by using a separate plug-in. Such a plug-in is able to monitor even the mode the application is in and triggers the driver to load a special configuration for this mode.In the panel's status bar the value of the Active Application entry could e. g. be "Inventor/Part". This means the application "Inventor" (a well known CAD application) is in the foreground, and it is in the mode "Part". Loading a configuration works in the same manner as described above: If there is a file "Part.cfg" in the subfolder "Inventor" it is loaded as soon as the application enters the mode "Part".
Additionally a plug-in could provide the driver and the panel with further information about the supported application. For instance, the plug-in for Inventor integrates its menu structure into the Function Assignment dialog; the user can assign a menu item to a device key in a comfortable way, s. Fig. 3.9.
3.4.3 Special Handling for the Windows Explorer
The mechanism of loading configuration files for the foreground application leads to a problem if the SpaceControl Panel is not already started. Say, you have got the application "notepad" into the foreground and want to configure its special, already existing configuration file "notepad.cfg". Therefore, you need to open the SpaceControl Panel and click into the start menu to do this, but since the Windows desktop is just an instance of the Windows Explorer, the Windows Explorer is the foreground application in this moment! And the driver loads the configuration file "Explorer.cfg", if it exists, or the file "common.cfg" if not. In any case, the configuration for your application "notepad" is replaced, and you are forced to click it again to bring it into the foreground. That is annoying.Therefore there is a special treatment for the Windows Explorer: If the driver detects the Explorer as foreground application it waits ten seconds before loading its configuration file. This should be enough time to navigate through the start menu and to start the SpaceControl Panel .
Disadvantage: If you really want to have a special configuration for the Explorer you have to wait these ten seconds before you can use it. In this case, adjust the setting "explorerDelay" in the file "SpaceController\daemon.ini" in your home directory. If set to 0 the Explorer is treated as any other application.
3.4.4 Technical Notes for System Administrators
This section contains some details useful for setting up default configuration files and for preserving them from being deleted when updating the driver. Important are these facts:- Each user has its own configurations.
- Each device (in case more than one are connected) has its own configurations.
- All configurations are stored in files, not in the registry
(due to compatibility with Linux and OS X).
- There are default configuration files.
Table 3.1: Configuration files in a user's home directory when the driver is started the first time:
| Folder /File |
Description |
|---|---|
| SpaceController
|
Main folder. |
| +- Applications | Empty folder for files needed by plug-ins for
applications. |
| +- Devices | Empty folder for device configuration files. |
| +-daemon.ini |
Configuration file for the driver. |
| `-panel.ini | Configuration file for the SpaceControl Panel. |
The folder "Applications" is empty at first and will be filled when plug-ins are installed and started the first time. The same is with folder "Devices": It is empty at first and will be filled when a device is connected to the computer the first time. If both have occured the file structure will be as in the following example:
Table 3.2: Configuration files in a user's home directory when plug-ins are installed and devices has been connected:
| Folder /File
|
Description |
|---|---|
| SpaceController
|
Main folder. |
| +- Applications
|
Folder with files needed by plug-ins for applications.
These are only there if the appropriate plug-in is
installed. |
| | +-catia.ini |
Configuration file with settings for the Catia plug-in.
|
| | +-catia.mnu |
File with Catia's menu structure. |
| | +-proe_WF4_plugin.ini | Configuration file with settings for the Pro/ENGINEER plug-in. |
| | +-ProEngineerWF4.mnu | File with Pro/ENGINEER's menu structure. |
| | `- ... |
Further files needed from plug-ins. |
| +- Devices
|
Folder with configuration files of all devices once
connected to the computer. |
| | +- MB1USX09010001V
|
Folder with all configuration files for the device with
serial number MB1USX09010001V. |
| | | +- Catia |
Folder with all Catia's configuration files. |
| | | | +-2D Mode.cfg |
Device configuration for Catia's 2D mode. |
| | | | `-3D Mode.cfg | Device configuration for Catia's 3D mode. |
| | | +- ProEngineerWF4 | Folder with all Pro/ENGINEER's configuration files. |
| | | | +-Assembly.cgf | Device configuration for Pro/ENGINEER's assembly mode. |
| | | | +-Part.cgf | Device configuration for Pro/ENGINEER's part mode. |
| | | | `-*.cgf | Further configuration files for other Pro/ENGINEER
modes. |
| | | +- ... | Further folders for other applications. |
| | | +-common.cfg | Standard configuration if there is no other
configuration for an application. |
| | | +-googleearth.cfg | Special configuration for GoogleEarth. |
| | | `-... | Further special configuration files for applications. |
| | +- MC1UWX09020203U | Folder with all configuration files for the device with
serial number MC1UWX09020203U. |
| | | +- Catia | Same as above for this device. |
| | | +- ProEngineerWF4 | Same as above for this device. |
| | | `- ... | Same as above for this device. |
| | | +-common.cfg | Same as above for this device. |
| | | +-googleearth.cfg | Same as above for this device. |
| | | `-... | Same as above for this device. |
| | +- ... | Further folders for other devices. |
| +-daemon.ini |
Configuration file for the driver. |
| `-panel.ini | Configuration file for the SpaceControl Panel. |
Where do the *.cfg files in the user's home directory come from? These files are copied from the driver's installation directory as soon as a device is connected with the computer the first time. The installation directory can be chosen during the installation process, the default one is "C:\Program Files\SpaceControl" or "C:\Program Files (x86)\SpaceControl" on 64 bit machines. In this folder there is the subfolder "cfgs", and its content is copied completely into the folder with the device's serial number in the user's home directory.
Now it is clear what to do if you want to provide your special default configurations for all users and devices: Just save your set of configuration files into the folder "cfgs" of the driver's installation directory, and these are copied when a user connects a device the first time with the computer. From this moment on the user may of course change his configurations on his own.
When deinstalling the driver it will ask you to delete your SpaceController folder. If you install a new driver software and an old SpaceController folder is found when the driver is started the first time, it will be renamed e. g. to "SpaceController_1.1.0" (if the old driver version has been 1.1.0), the driver will create a new folder "SpaceController" and copy all files in it. In case the format of the files has changed the driver will convert the files automatically.
3.5 Remote Control of Applications Over the Network
3.5.1 Overview
Since the communication between driver and plug-ins is done over TCP/IP - normally only on the local machine - you can do this over the network as well by modifying three configuration files. You can implement the following scenario (of course with an arbitrary number of clients):
Fig. 3.26: Client/Server environment for remote control
The applications to control, e. g. Inventor or NX, are installed on a network server (it may have a more advanced graphics card than the clients). The clients get access to the server's desktop with an appropriate remote control software, e. g. Microsoft's Remote Desktop or TeamViewer. The 3D controllers are connected via USB with the clients as usual .
Normally our plug-ins connect with the local running driver. Now you have to take care that the plug-ins running on the server connect with the driver on the clients. This can be achieved by providing the configuration files "spc_ctrlr_dll.ini" and "siapp_dll.ini" with the IP address or the network id of the client you want to speak with.
The driver on the client is not able now to detect if an application on the server is in the foreground of course and should be forced to send the data permanently to the server therefore. But this would be not very handy: The scene in the application would move even if on the client another local application is in the foreground which should be controlled exclusively. To avoid this the driver can check if the remote control software is in the foreground and sends the data to the server only in this case. To let the driver know what remote control software you are using its binary name has to be put into the local "daemon.ini" file.
There are two restrictions:
- Client and server must run the same operating system. It is not possible for example to control a Windows server from a Linux client or vice versa. But different Windows versions on client and server are no problem.
- The remote control is working only if the application to control (respectively its plug-in) communicates with the driver over TCP/IP. But this is not the case for all applications: Creo, Google Earth, HiCAD, hyperCAD and Pro/Engineer e. g. are using an interface based on Windows messages and cannot be controlled in this way. In such cases it may be possible with third party software e. Eltima's "USB Network Gate") to transfer USB signals over the network rather than just IP packets; contact our support for this scenario. Only some catchwords are given here: In this case an instance of the driver must be started for each user on the server ("sc_daemon.exe -i"), which communicates exclusively with its client over an individual port (parameters "port" and "exclusiveDevice" in file "daemon.ini").
3.5.2 Configuration on the Server's Side
You have to do the following on the server:- Install the SpaceControl driver software:
The driver is not needed for operation but the plug-ins and some DLLs must be installed. - Create the folder structure:
The plug-ins expect a folder structure for their configuration files in "C:\Users\<user name>\SpaceController\". The folders are created in a user's home directory when the driver starts the first time. The driver must be started therefore once on each user account. - Create configuration files:
The configuration files described in the next section are created in the folder "C:\Users\<user name>\SpaceController\" when the application starts (better said: when it ends) the first time. The application you want to control must be started and ended once therefore if the needed configuration file is not there.
Furthermore our plug-ins (with the exception of the Universal Plug-in) create a so called MNU file when started the first time containing the menu commands of the application. This file has to be copied to all clients, see below.
- Modify the configuration files:
Which configuration file is needed depends on the application you want to control. Most of our plug-ins use the file "spc_ctrlr_dll.ini", but our Universal Plug-in uses the file "siapp_dll.ini". It is best to modify both of them: You just have to assign the IP address or the network id of the computer you want to control the application from to the parameter "ipv4Addr"; overwrite the old value "localhost".
Samples:
- ipv4Addr = localhost # this is the default value and must be overridden by
- ipv4Addr = saturn # the network id of a computer "Saturn" e. g. or by
- ipv4Addr = 192.168.30.74 # its IP address
3.5.3 Configuration on the Client's Side
You have to do the following on each client:- Install the needed plug-ins:
The plug-ins are not necessary on the clients, but we need the configuration files ("assembly.cfg", "part.cfg" etc.) to modify them with the SpaceControl Panel. These files are copied with default values to the client during installation.
- Define the Remote Desktop Software:
The driver should be prevented from sending data to applications not in the foreground. Running on the client, the driver can only detect if the local remote control software is in the foreground (not if an application on the server is in the foreground there) and can stop sending data to the server if not. You can let the driver know the binary name of your remote control software: Assign its binary name to the parameter "remoteSoftware" in file "daemon.ini". Suppress the file extension ".exe".
Samples:
- remoteSoftware = # the default value is empty and must be overridden by a binary name
- remoteSoftware = mstsc # "mstsc.exe" is the binary name of the Microsoft Remote Desktop client
- remoteSoftware = TeamViewer # "TeamViewer.exe" is the binary name of the TeamViewer client
- Copy the MNU file(s):
When started the first time our plug-ins (with the exception of the Universal Plug-in) create a so called MNU file containing the menu commands of the application. This file has the extension ".mnu", is located in folder "C:\Users\<User name>\SpaceController\Applications\" and is needed by the driver and the SpaceControl Panel as well. Copy it into the same folder on each client.
3.5.4 Configuration of the Firewall
The firewall must be configured to allow the communication between all of the involved software components:- The driver process on the clients is "sc_daemon.exe"; it is listening on port 31415 for communication requests from the plug-ins. (The port number can be changed in file "daemon.ini" if needed.)
- The plug-ins are normally DLLs and part of the applications to be controlled therefore. Their EXE files must be allowed to communicate; in case of Inventor its name is "inventor.exe" e. g., in case of NX its name is "ugraf.exe".
3.6 The C++ Application Programming Interface
For the C++ API documentation's main page click here. All functions available in the API are listed here.3.7 The Java Application Programming Interface
For the Java API documentation click here. All functions available in the API are listed here.4 Troubleshooting
If you have problems with the device, please, read these hints before contacting the hotline.| Problem | Solution |
|---|---|
| No movement of objects in applications. |
Make sure the driver is running. If it runs a tray icon
with the SpaceControl logo is displayed on the right side
of your Windows start bar. Make sure you have the plug-in for your application installed: In the Windows Start Menu in the folder "SpaceControl/Plug-ins" should be an entry for your plug-in. |
| Driver is running, still no movement of objects. |
Open the SpaceControl
Panel with menu item "SpaceControl/Start
SpaceControl Panel" in your start menu or by double
clicking the driver's tray icon. Try the cube demo. If the
cube is moving restart your application to initiate the
connection process again. |
| I just installed the driver, and nothing happens in the SpaceControl Panel's cube demo when moving the cap. | Unplug the device and plug it into your USB port again. In rare cases the USB connection can not be established when connecting the device the first time. |
| The SpaceControl
Panel displays "try to connect ..." and a moving
bar in the status line. |
Start the driver with menu item Start Driver in
Window's start menu. |
| The SpaceControl Panel's cube demo is not working. | Eventually the transmission of data has been
deactivated by some settings in the Advanced
Configuration dialog. Press the button Defaults in the main
window to set all parameters to the default values again.
|
| I observe a drift of my objects. |
Open the SpaceControl
Panel, release the cap and press the Zero button. See here for details. This effect may also be seen if your power supply via USB is instable. Use an active USB hub instead of a passive one or, better, no hub at all. |
| I observe a wobbling of my objects. |
This may be caused by accidental power oscillations.
Adjust the threshold or use data
averaging. In some cases
it may help to turn the blue LEDs off to stabilize the
power supply. |
| I have a very jerky moving of the sliders and see often
a dialog box with the error "Setting parameters failed!".
|
Try to connect the device directly to your computer,
not using USB extension cables or especially USB hubs.
Sometimes these cause a delay in communication resulting
in these effects. |
| The SpaceControl Panel's sliders and other
control elements are flickering if the in-built cube demo
tab is open. The menus are not usable in this state. |
This is most likely a problem with your graphics card
driver. Install the latest version. If this is not
possible you can start the SpaceControl Panel with a special
option: Open a command window and navigate to the
SpaceControl program folder (usually "C:\Program Files
(x86)\SpaceControl"). Type jre8\bin\java.exe -Dsun.java2d.noddraw=true -jar sc_gui.jar This starts the Java interpreter and loads the SpaceControl Panel application with disabled Direct3D support for the GUI elements. To make the SpaceControl Panel usable again if it is in the flickering state, change back from the Demo tab to the Device tab. This hint is obsolete: The panel is started with this option automatically now. |
| The SpaceControl
Panel crashes when the device is plugged into the
computer or an obscure dialog concerning Java 3D is
displayed. |
This may occur if your graphic card driver has no
suitable support for OpenGL or Direct3D. Install a new
graphics card driver to fix it. If this is not possible
you can start the SpaceControl
Panel without the in-built cube demo, this avoids
using 3D graphics: Open a command window and navigate to
the SpaceControl program folder (usually "C:\Program Files
(x86)\SpaceControl"). Type jre8\bin\java.exe -DDemoOff -jar sc_gui.jar This starts the Java interpreter and loads the SpaceControl Panel application with disabled cube demo. This hint is obsolete: The panel disables the cube demo automatically if problems are detected. |
| The SpaceControl
Panel opens but does not show the device panel of
a connected device. |
This may happen if your graphics card is in 256 color
mode. Set it to 16 bit or true color. |
| The SpaceControl Panel
opens but shows an empty window on Vista 64 Bit or Windows
7 64 Bit. |
Right click on the "SpaceControl/Start SpaceControl
Panel" entry in the SpaceControl's start menu and open the
properties. There is a tab "Compatibility"; deactivate the
"Visual designs". |
| The SpaceControl
Panel loses the connection to the driver for a
short time when changing the configuration. |
This may happen if the device is connected via a USB
hub with the computer. Connect it directly. |
| If I press the Help button on a dialog my browser opens the help file always in the first line, not in the appropriate chapter. | This is a bug in older Internet Explorer versions.
Newer versions, Chrome, Firefox, Opera and Safari are
known to be working. If you don't want to use one of these
as default browser you may use it as help browser for the
SpaceController only, see the Preferences
dialog above. In the Internet Explorer click into the address field and press the return key to jump to the wanted section. |
| The display shows the text "unknown" after assigning a
function to a key. |
This may happen after the first start of a plug-in.
Workaround: Put another application into the foreground
and switch back. |
| The SpaceController does not work in Google Earth. |
You have to switch on 3D controller support in Google
Earth: Open the options dialog with menu item
"Tools/Options..." and check the field "Enable Controller"
under tab "Navigation". |
| The SpaceController does not work in Rhino 5. |
Type "TestSpaceBall" into Rhino's command line,
deactivate the new interface and restart Rhino. |
| Rhino 5 rotates always around the scene's z-axis when I
rotate around the y-axis of the SpaceController. |
Click in Rhino on "File/Properties..." and activate the
parameter "Rhino Options/View/Rotate relative to view". |
| The SpaceController does not work in Rhino 6. | Type "SpaceMouse" into Rhino's command line, open the
command's "Popup_Menu" and activate "Rotate" and "Pan
Zoom". Or press function key 5 on the device which has the
the macro "Activate SpaceController" assigned. The orientation of the z-axis' translation and rotation should be reversed in our Advanced Configuration dialog. |
| KeyShot 5 freezes my computer. |
KeyShot 5 causes nearly 100 % CPU load even without any user interaction. Together with the reading thread of our Universal Plug-in the computer may freeze. To avoid this open the Windows Taskmanager and detract a CPU core from the process "keyshot5.exe". |
| The driver does not start under macOS Sierra (10.12). |
In file /etc/hosts the line 127.0.0.1 localhost must be added. |
| Under macOS Sierra (10.12) the SpaceControl Panel cannot
connect to the driver. |
Reason: The operating system's function gethostbyid(),
called by the driver, does not find the IP address to the
computer's network id and returns after a 5 second
timeout. But the panel waits only 2 seconds for a response
of the driver. Workaround: Add a line with the computer's network id in file /etc/hosts: 127.0.0.1 <computer id>.local The computer id can be found in the Mac's System Preferences in the section "Sharing". Any spaces in the id must be replaced by hyphens. |
| The SpaceController does not work in Autodesk Inventor. |
Newer versions of Inventor block unknown add-ins by
default - you have to allow their execution first. To do
this click on menu item "Tools/Add-ins" and in dialog
"Add-ins Manager" on the entry "SpaceController Add-In".
In the area "Loading Behaviour" remove the check mark at
"Blocked" and activate the other two check boxes. |
| The SpaceControl Panel crashes when the so
called "GodMode" folder is present on the desktop. |
The Godmode folder is a folder with the name
"GodMode.{ED7BA470-8E54-465E-825C-99712043E01C}" and shows
many more links to Windows' configuration applications as
in the Windows Control Panel. Because of a bug in the Java
Runtime Environment all Java applications are affected
under Windows 10. There are two work arounds:
|
In case of further problems contact our support team:
E-mail: support@spacecontrol.de
Phone: +49 8152 90968-68
5 Technical Data
| SpaceController: |
|
| Dimensions (width, depth, height): | 198 mm, 199 mm, 81 mm |
| Weight: | 845 g |
| Power consumption: | 5 V, 65 mA (LEDs and LCD off) to 225 mA (LEDs and LCD set to max. brightness) |
| Power source: | PC via USB cable |
| Connection interface: | USB 2.0 |
| Cable length: | 1.8 m |
| Sensor: | optoelectronic |
| Ambient temperature range: | 15 °C - 40 °C |
6 System Requirements
Hardware:- PC with x86 CPU
- 1 GHz clock rate
- 512 MB RAM
- 200 MB free harddisk memory
- Screen resolution >= 1024 x 768 Pixel (for the SpaceControl Panel)
- Windows XP to Windows 10, 32 or 64 bit
- Linux 32 or 64 bit. We cannot permanently test all Linux
distributions, but it is very likely that our driver will run
without problems. We have made successfully the following
tests:
- Driver version 2.8.0 with Debian 7.8.0, Fedora 21,
openSuse 13.2 and Ubuntu 14.04.1 LTS
- Driver version 2.8.7 with Debian 8.7.1 and Fedora 25
- Driver version 2.8.8 with Debian 9.1.0, Fedora 26, openSuse Leap 42.3 and Ubuntu 16.04.02 LTS
- Driver version 2.9.0 with Debian 9.3.0 and Ubuntu 17.10
- Driver version 2.9.1 with Debian 9.4.0, Fedora 27.1.6, openSuse Leap 42.3 and Ubuntu 17.10
- Driver version 2.8.0 with Debian 7.8.0, Fedora 21,
openSuse 13.2 and Ubuntu 14.04.1 LTS
- macOS or OS X from version 10.8 on
- for requirements concerning the plug-ins see above
- Web browser for reading the documentation
- X11 (Linux only)
7 Change Log
21 August 2018, Version 2.9.3- Since version 2.9.2 the SpaceControl-Panel stores its configuration file "panel.ini" automatically when the computer shuts down. Unfortunately this does not work under Linux, the file can even get corrupted and prevent the panel from starting the next time. In this case the file is restored from a backup now.
1 August 2018, Version 2.9.2:
- If multiple instances of an application were open the data has been sent to all of them not only to the one in the foreground.
- The acceleration for scrolling can be switched on and off
now in the Wheel Function Launcher.
- Under Linux the auto start option did not work reliably. Now a file "SpaceControl-Driver.desktop" is created in folder "~/.config/autostart/" as the FreeDesktop standard recommends.
- Under Windows and Linux the key "Insert" could not be used in macros.
- Under Linux some applications (Xedit e. g.) could not be detected as foreground application.
- 3ds Max 2019 is supported (Windows only).
- AutoCAD 2019 is supported (Windows only).
- Creo 5 is supported (Windows only).
- The SpaceControl Panel stores its configuration automatically now if the computer is shut down.
- Under Windows the MinGW GNU compiler 7.3.0 and the FTDI driver 2.12.28 is used.
- Under Linux the MinGW GNU compiler 6.3.0 and the FTDI driver 1.4.8 is used.
- Under macOS the FTDI driver 1.4.4 is used.
- The Java Runtime Environment 1.8.0_172-b11 is used.
- The user manual has a navigation bar on the left side
containing the contents, is ported to HTML 5 and is
responsive.
9 April 2018, Version 2.9.1:
- Bug in Siemens-NX-Plug-in fixed.
- Blender plug-in enhanced; vertices etc. can be moved in Blender's Edit Mode now.
- Universal Plug-in has some new internal functions and supports Rhino 6 better.
- Some applications, using the older messages interface for communication, register several windows for data exchange and not only one. This is considered now by the driver, and ThinkDesign e. g. is better supported therefore.
- A bug caused Catia to run only with parameter "sendMode" set to "0" in file "daemon.ini".
- Under Linux the first one or two characters in a macro has been swallowed if triggered by the Wheel Function Launcher.
- Our new device "Astuto" (not on the market yet) is
supported.
11 December 2017, Version 2.9.0:
- Siemens NX 12 is supported (Windows).
- Due to an incompatibility in the SC DLL some plug-ins had decreased performance. These plug-ins are improved.
- In this context there is a new parameter "dllReadTimeout" in
file "spc_ctrlr_dll.ini". If there is a stuttering movement in
an application it should be set to 50.
- Detection of the foreground application is enhanced. The CAM software Vericut is working now therefore (Windows).
- The driver could crash while shutting down the computer if a
device has been removed before.
- Minor bug-fixes.
5 October 2017, Version 2.8.9:
- The right Ctrl and Shift keys has not been working in macros.
- The calculator did not calculate operations correctly
immediately after the RCL or EXC key have been pressed.
- Blender plug-in enhanced; more devices than just one can be used simultaneously.
- There is an Universal Plug-in for macOS now.
- Universal Plug-in for Windows enhanced.
19 July 2017, Version 2.8.8:
- Creo 4 is supported (Windows only).
- AutoCAD 2018 is supported (Windows only).
- 3ds Max 2018 is supported (Windows only).
- You can trigger a selected function in the Wheel Function Launcher by pressing the device's CTRL key now.
- In the Function Assignment dialog you can copy user
functions with "copy and paste" now.
- Moving the cap with activated option Restore Mouse Position in dialog Advanced Configuration has crashed the driver under Linux.
- There is a new parameter deviceCheckingTime in file
"daemon.ini". If its value is 5 e. g., the driver checks only
for five second after its start if SpaceControl devices are
connected or disconnected. The default value is 0; this means
the check is always performed.
(Meaning: The driver of the USB chip [FTDI] built into our device has a bug which may lead to interferences with other devices with a FTDI chip if the check is active.) - Universal Plug-in enhanced.
11 April 2017, Version 2.8.7:
- The 2D/3D key does not work reliably with a second function assigned to it. The driver has resetted the device and other strange effects could occur.
- The driver has prevented the screensaver from being activated when moving the cap, but not the system from going into sleep mode.
- When resuming from the computer's energy saving modes, the driver could crash sometimes.
- The Solid Edge plug-in could crash after executing Solid Edge's menu function "PMI/Section".
- The Catia plug-in uses ready-made MNU files now rather than
creating them by itself.
- Under Linux FreeCAD versions newer than 0.14 are running again.
- Default configuration files for Blender enhanced (double
press, "...-nonnormal.cfg" files available).
- New parameter "exclusiveAppl" in file "daemon.ini". If an application name is given here (mostly as shown in the SpaceControl panel's status line, in the other cases the application's binary name without the ".exe" extension) only that application will receive data, even if it is not in the foreground.
- Our entries in the PATH environment variable are added at
the beginning and not at the end now. Otherwise it could
happen that wrong (= older) GNU DLLs of the same name
from other software have been loaded instead of our newer
ones.
- New Java Runtime Environment version 1.8.0_121.
- When unplugging a device a deadlock could occur, causing a
semi-crash of the driver.
28 November 2016, Version 2.8.6:
- There is a shift level for the device's keys now. You can switch to it with the new device function "SwitchKeyShiftLevel". Alternatively you can trigger the second function on a key by double pressing it.
- The plug-ins are aware of the new device functions "Back",
"Left" and "Bottom". By default they are assigned to the shift
level (double press) of the keys FRONT, RIGHT and TOP.
- On some computers data has been sent to applications
although not in the foreground.
- The menu item File/Stop Driver in the SpaceControl
Panel will work now even if the driver does not react on
commands anymore; the process "sc_daemon.exe" is killed in
such a case.
- Some minor bugs in the AutoCAD plug-in are fixed. There is a
new "hybrid" mode in the plug-in; in this mode AutoCAD
interprets the translation and rotation data by itself, the
plug-in is only responsible for the device keys.
- Siemens NX 11 is supported. The NX plug-in can be run in a hybrid mode as well.
- Minor bugs in the Blender plug-in are fixed.
- A rotation center defined in Solid Edge for the normal mouse
will be used by the SpaceController now.
- New GNU compiler version 6.2.0 used under Windows.
1 June 2016, Version 2.8.5:
- New GNU compiler version 5.3.0 used under Windows.
- New Java Runtime Environment version 1.8.0_77.
- New Java 3D version 1.6.0.
- If the Mouse Movement is activated the sending of data to connected applications is suppressed now.
- 3ds Max 2017 is supported.
- AutoCAD 2017 is supported.
- Universal Plug-in improved (support for Tenado 3D added,
TurboCAD is working again).
- The graphical demos tend to appear with an empty window when started under Windows 10.
- Under OS X 10.11 ("El Capitan") the driver did not start without tricks, and the built-in cube demo could not be stopped once started.
- Icons have no ugly white border any longer.
14 March 2016, Version 2.8.4:
- Existing configuration files from version 2.8.1 and 2.8.2 have not been updated but replaced by new files with default values.
9 March 2016, Version 2.8.3:
- The device can control applications on a remote server now.
See section 3.5 for details.
- The plug-ins have the ability of remote control as well.
- A bug in the Blender plug-in is fixed.
18 November 2015, Version 2.8.2:
- Some of the settings in our SolidWorks plug-in have not been saved when closing SolidWorks.
- The installer of the Siemens NX plug-in copies some additional DLLs.
- Some bugs in the Blender plug-in are fixed.
- Under Windows 10 the help browser could not be started under some conditions.
- Minor bug-fixes.
15 July 2015, Version 2.8.1:
- Support for 3ds Max 2016 and 3ds Max Design 2016.
- Support for AutoCAD 2016.
- Blender plug-in enhanced, see readme file.
- Firmware update and its handling improved.
- Device pictures in the SpaceControl Panel updated.
- The device's lights remains off now even if the computer changes itself into the standby mode.
- Due to security reasons the driver daemon will accept
connection requests only from the SpaceControl Panel
of the same user.
- Installer improved; there is a "silent" mode for Linux now, see section 3.1.2.
- Changes in the OS X version:
- Installer improved.
- The foreground application detection did not work reliably with the SpaceControl Panel in the foreground.
- The configuration files could get corrupted with two devices connected to the computer.
- The lights are switched off now when the computer goes into sleep mode, and the device will be reinitialized when it wakes up.
- Firmware update is working now.
2 April 2015, Version 2.8.0:
- Firmware update is working now under Apple OS X.
- Various bug-fixes under Linux, among other things the Panel key and executing macros with the WFL is working now even with other desktops than XFace (KDE, Gnome).
- The macro function Execute only in case of state change works with the device keys as well now, not only with the cap deflections. See section 3.3.3.2.
- We have a plug-in for the DCC software "Blender".
- Plug-in for 3ds Max is improved, it integrates its own menu in 3ds Max.
- The NX Viewer is working again without editing the
"daemon.ini" file.
- 64 bit applications compiled with Visual Studio 2012 could
not load our Universal Plug-in when run on Windows 8.1.
Because of a similar problem the plug-ins for Inventor and
AutoCAD are recompiled.
- GNU compiler changed from version 4.7.1 to 4.9.2.
- Java runtime changed from version 7 to version 8.
- Linux and OS X driver are not in the beta state any longer
and contain a plug-in for Blender as well.
5 November 2014, Version 2.7.0:
- There is a new function scTransferCallbackFunction() in the C++ API. The callback function is to be defined by the user and called automatically as soon as new data is available from the device; it gets the actual device data packet in its parameters. It may spare you some thread handling needed when using scFetchStdData() instead.
- The Inventor Plug-in has a "hybrid" mode, and you can use the Universal Plug-in additionally to achieve higher performance. Ask our support for details.
- AutoCAD 2015 (64) and Inventor 2015 (64) could not load our plug-ins under Windows 8.1 (64).
- Creo 3.0 is supported.
- A beta driver for Apple OS X is available.
- Some bug-fixes in the beta Linux driver, e. g. the CPU load is much smaller now, the installer is enhanced.
16 July 2014, Version 2.6.3:
- GstarCAD from Gstarsoft Co. Ltd. is supported. The plug-in
is in beta state though, there are still some problems when
refreshing the screen.
- The wheel shows in the Wheel Function Launcher and if moving sliders an acceleration now if moved fast. With the parameter "wheelAccelerator" in file "C:\Users\<Userid>\SpaceController\daemon.ini" you can control the effect or switch it off again.
- The installer knows in its "silent" mode a new parameter "/P=<list of wanted plug-ins>" and the uninstaller a new option "/UF=delete". See section 3.1.1 for details.
- The plug-in for Siemens NX is updated, see Readme file there.
- There is a new function scRegisterCallbackFunction() in the C++ API. The callback function is to be defined by the user and called automatically as soon as new data is available from the device; it gets the actual device data packet in its parameters. It may spare you some thread handling needed when using scFetchStdData() instead.
16 June 2014, Version 2.6.2:
- SpaceController "blackline" is supported.
- Help videos may be installed locally.
- Autodesk 3ds Max 2015 und 3ds Max Design 2015 are supported.
- The CAD/CAM software Tebis supports SpaceControl devices
directly now:
- The Universal Plug-in is not necessary any longer therefore.
- For older Tebis versions you have to enable our Universal Plug-in again by deleting line "tebis = tebis tebis" in files "siapp_dll.ini" and "daemon.ini". Both are located in folder "C:\Users\<Userid>\SpaceController\".
- The available Tebis functions are integrated into the Function
Assignment dialog. If you want to see these
functions in German and not in English delete file
"tebis.mnu" and reid file "tebis_de.mnu" to "tebis.mnu".
Both files are located in folder
"C:\Users\<Userid>\SpaceController\Applications\".
Do the same with the files "tebis.cfg" and "tebis_de.cfg"
in folder
C:\Users\<Userid>\SpaceController\Devices\<SerialNo>\".
- The Universal Plug-in could not transmit data into the
simulation window of Mastercam X7.
- The AutoCAD plug-in has been reworked and supports all move
modes and AutoCAD 2015 now. If upgrading from older driver
versions have a look at the AutoCAD plug-in's Readme file,
please! You can find it in the Windows Start menu.
- Under Windows the SpaceControl Panel does not
inspect the Java system property "user.home" any longer to get
the user's home directory but inspects the environment
variable "USERPROFILE" as the daemon does. This is changed
because "user.home" points to a wrong location on some network
installations due to a Java bug.
16 January 2014, Version 2.6.1:
- Some special characters caused problems when sent to the
device's display.
- The plug-in for Siemens NX is updated to version 2.6.1.
- The Universal Plug-in is working with Autodesk Revit again.
21 November 2013, Version 2.6.0:
- When changing the foreground application it could happen that the old foreground application's configuration was transfered to the new foreground application's configuration. The former configuration was lost then.
- The driver has not been able to detect applications installed on network drives as foreground applications.
- Installer and uninstaller delivered the error code 1223 even in case of successful installation/deinstallation; now the correct value 0 is returned.
- The Catia plug-in has failed on some network installations to detect Catia's language setting. In consequence Catia's menu items could not be read and their assignment to the SpaceController's keys has not been possible.
- Our installer adds some new entries into the PATH environment variable. If getting longer then 1024 characters the installer wiped out the variable.
- The device's illumination is switched off after 10 minutes
of inactivity now. This time can be adjusted with the new
parameter "timeBeforeSleeping" in the driver's configuration
file "daemon.ini".
- New compilation with updated development environment.
- New API functions scGetDaemonPar() and scSetDaemonPar().
- New plug-in for PTC Creo 1.0 and 2.0; it is a DLL now and does not delete Creo's undo buffer any longer.
- New plug-in for Siemens NX is available. This is a beta
version yet. In case you observe non-tolerable bugs you can
reactivate the former mechanism for using NX (without plug-in,
no mode detection available therefore):
- Uninstall the plug-in.
- Open the file "C:\Users\<userid>\SpaceController\daemon.ini" and remove the line beginning with "NX" in section [SUPP_APPLS].
- Restart the driver.
- Linux driver is available.
10 April 2013, Version 2.5.1:
- The new calculator has delivered wrong results in case of percent calculation in combination with the plus and minus operators.
- The plug-in for 3ds Max has not worked with 3ds Max Design 2013.
20 March 2013, Version 2.5.0:
- A new SpaceControl command "HandleCalculatorNumPad" is implemented. It can be assigned to a key or the WFL. In this case a little dialog appears to send number characters to the foreground application. You can input numbers with your mouse in this way.
- In the same dialog you can find a little calculator. Calculation results can be sent to the foreground application as well.
- The wheel understands gestures now: By appropriate moving in left and right direction you can trigger functions if gesture detection is activated.
- There are two new events you can assign functions to in the Function Assignment dialog: "Cap movement started" and "Cap movement stopped" (i. e. "cap touched" and "cap released").
- In the Function Assignment dialog the check box Send
Function Only in Case of Cap Changes affects all cap
makros and events globally. Now you can configure this
individually for each macro when adding the function Execute
only in case of cap state change to the macro. You can
find this function in the drop down list Other Key or
Function.
- There are 64 free programmable User Functions (macros) now
instead of the only 18 as used to be.
14 January 2013, Version 2.4.2:
- Some bugs concerning the GEN and its illumination are fixed.
- The Wheel Function Launcher contains a function Pause now in its function list. It keeps the dialog open and does nothing. This enables you to change the settings in the dialog even if you have set a very short Autotrigger Delay.
- The default values in the configuration files are slightly modified. You can not modify the cap's function by accident any longer.
- The device type data can be copied with Ctrl-C from the GUI.
- The slider dialogs (device functions "HandleSensitivityDialog" etc.) did not work reliably sometimes when triggered by the WFL.
- With the new parameter "sendDelay" in the driver's configuration file "daemon.ini" you can avoid sending data too early to a new foreground application. SpaceClaim e. g. likes to crash in this case.
- All applications may use MNU files now. See the technical notes for details.
- SolidWorks plug-in is strongly improved.
13 November 2012, Version 2.4.0:
- Our new, smaller device GEN is supported.
- Applications using a legacy communication protocol are detected now when coming into the foreground. The driver asks for enabling the old protocol.
- The driver can handle several devices concurrently now, a "Master" device is not necessary any longer.
- The driver informs supported applications now when they come into the foreground. The applications can react on this event and send the mode they are in e. g. (important if more then one instance is open).
- In the driver's configuration file "daemon.ini" some new
parameters are used:
- maxBytesInRxQueue:
If this value is bigger than 0 after each of the device's handled data packet the receicve queue is read again (without handling the data) until the queue contains less bytes than or equal the value says. In some applications this mechanism can avoid a time lag in movement. Example: The data packet for the cap's standard data contains 15 bytes. If you set maxBytesInRxQueue to the value 45 the queue can contain three data packets at the most after releasing the cap.
- sendMode
This parameter controls how the SpaceController's data is distributed to the applications. The data is sent only to the foreground application as before or to all connected applications or to the application the mousepointer is over. - singleComPerAppl:
"LegacyCom2" applications as Google Earth or Pro/ENGINEER connect themself to the driver to get data from the device. Pro/ENGINNER does this wrongly several times with bad impact to the performance. If this parameter is set to "on" the driver accepts only the first connection. If using Pro/ENGINEER this parameter should be set to "on" therefore. - blinkPeriod:
The GEN's LEDs are blinking while the Wheel Function Launcher is waiting on input. Here you can set the time (in milliseconds) the LEDs are on and off respectively (i. e. the half period).
- maxBytesInRxQueue:
- Unused elements are not longer shown in the Wheel Function
Launcher.
- The plug-in for Autodesk Inventor is improved. See the change log there.
- The plug-ins for Pro/ENGINEER are improved. See the change log there.
- The plug-in for Solid Edge is improved. See the change log there.
- The Universal Plug-in is improved, applications like
CimatronE are supported now.
- Configuration files for Excel, Word, Outlook, Internet Explorer, Firefox, Opera and Acrobat Reader are delivered.
- Minor bug-fixes.
12 September 2012, Version 2.3.2:
- A plug-in for AutoCAD 2013 is delivered (version 2.4.0 beta 1).
- The plug-in for Autodesk Inventor is strongly enhanced, see the change log there (version 2.4.0 beta 4).
- The plug-in for Catia is enhanced, see the change log there (version 2.4.0 beta 2).
- The plug-ins for Pro/ENGINEER are enhanced, see the change log there (version 2.4.0 beta 1).
- The plug-in for Solid Edge is enhanced, see the change log there (version 2.4.0 beta 2).
- The Universal Plug-in is enhanced, see the change log there (version 2.4.0 beta 6).
- The driver is unchanged, only the plug-ins are replaced by
the versions listed above.
30 May 2012, Version 2.3.1:
- The Universal Plug-in is enhanced, applications like Alibre Design are supported now.
- The plug-in for Catia is improved. See the change log there.
19 April 2012, Version 2.3.0:
- The SpaceControl Panel 's
main dialog is slightly redesigned.
- The most sliders in the SpaceControl
Panel's main dialog are displaced into the dialog Advanced Configuration.
- New fields ORG, CAM and WFL in the display's status line are
available. Attention: These fields will be displayed only with
a firmware from version 2.141.141.130.0 on. Update your
firmware if necessary.
- There is a new button Video on all dialogs; pressing it opens your Internet browser and shows a short video explaining the dialog.
- The cap's characteristic is changed from quadratic to cubic.
In the configuration file "daemon.ini" you can choose between
different cap functions with parameter "capCharacteristic";
the value 6 is the one of former versions.
- Date and time will be displayed reliably again on the device's display.
- Firmware update reworked.
- The plug-ins for Solid Edge and Catia are significantly improved. See the change log there.
- Plug-in for AutoCAD 2012 is delivered with the driver.
- After returning from standby or hibernate mode the foreground application was not detected by itself and the configuration not loaded therefore.
- While triggering a function with the WFL and nearly concurrent changing of the foreground application the configuration of the new foreground application could be lost.
- The device functions LoadConfiguration_x can now be
triggered by the WFL.
- Minor bug-fixes.
7 December 2011, Version 2.2.2:
- Converting the configuration files from version 2.0.0 to 2.2.1 caused a crash.
24 November 2011, Version 2.2.1:
- API functions scConnect() and scSetState() replaced by scConnect2() and scSetState2() . See the API documentation for details.
- The built-in cube demo supports all move modes now (object mode, camera mode etc., see section Move Mode).
- New device functions ToggleObjectCameraMode , ToggleScreenOriginRotation , ToggleLockHorizon , ToggleHover.
- Recorded key sequences may consist of up to 42 key presses now.
- The SpaceController keys may be recorded in macros and can be combined in this way.
- The Display can show the SpaceController's device functions in German as well now.
- If the driver is updated your own settings will be preserved
now. This works for configuration files from driver version
2.0.0 on.
- Autodesk 3ds Max is supported.
- Minor bug-fixes.
15 July 2011, Version 2.1.2:
- The new Wheel Function Launcher allows you to trigger functions with the silver or grey wheel too.
- The Advanced
Configuration dialog allows you to configure the
device for using it with the right hand.
- If the checkbox Restore Mouse Position is activated in the Advanced Configuration dialog the mouse pointer's position is restored not only when the cap is released, but also when the mouse pointer reaches the screen borders.
- A second instance of an application has not been detected as foreground application, the cap data has been sent still to the first instance.
- LEDs and LCD are switched off when the driver is stopped or the system goes down into standby or hibernate mode.
- Moving the cap will stop the screensaver and prevent it to
be activated.
- Detection of Pro/ENGINEER Wildfire 5 and creo as foreground application did not work reliably.
- The user interface can be switched between English and
German now.
- New test mode for internal production tests implemented.
1 February 2011, Version 2.0.0:
- Driver and all plug-ins are combined in one big installation program.
- Even if some instances of the same application are started, only the foreground application of this group will get data from the SpaceController.
- Eventual graphics card driver problems do not prevent the SpaceControl Panel from
starting.
- Internal changes due to a new compiler version.
5 October 2010, Version 1.4.3 beta:
- Displaying the foreground application's name in the device's LCD works again.
- Firmware update routines rewritten.
- Bug in writing configuration files fixed.
- The function editor swallowed the next key event after pressing the Alt key.
- When using a German Windows the German user manual is
opened.
- With most browsers the user manual opens reliably in the
right section now when pushing the Help button in a dialog; unfortunately the
Internet Explorer has a bug preventing this.
23 August 2010, Version 1.4.2:
- The user manual is available in German now.
- A configuration file loaded by hand is displayed in the LCD
now correctly.
- A bug in starting the correct version of the plug-in for Pro/ENGINEER is fixed.
22 July 2010, Version 1.4.1:
- The driver is aware of our new AutoCAD plug-in.
- Minor bug-fixes.
20 April 2010, Version 1.4.0:
- Occasionally the SpaceControl Panel was not able to connect to the driver again if it was stopped and restarted.
- German umlauts are allowed now in user function ids.
- Deleting of the users' configuration folders when deinstalling the driver works now also with Windows Vista and Windows 7.
- The device's illumination can be switched off and on by pressing the "Ctrl" and "Panel" keys concurrently.
- The rotation center can be adjusted within the Advanced Settings dialog
if supported by the CAD application.
- Some further bug-fixes.
- Attention:
This version is not compatible with plug-ins prior to version 1.4.0.
Older plug-ins must be run with drivers <= 1.3.0 beta (note: version 1.3.0 beta is an unpublished release).
Configuration files created with driver versions less than 1.4.0 can not be loaded by versions 1.4.0 and greater due to some new parameters.
15 January 2010, Version 1.2.1:
- Functions with German umlauts could not be displayed on the
SpaceController's display, in succession the device was a
little noncompliant to update its content.
- The SpaceControl Panel
closed itself occasionally when the device was plugged into
the USB socket.
Both bugs were built into the software in the course of the 64 bit modifications and are fixed now.
19 November 2009, Version 1.2.0:
- The driver is aware of 64 bit plug-ins now.
- The process "dwm.exe" is ignored as foreground application.
This invisible process is casually put into the foreground by
Autodesk Inventor and caused a heavy bucking because the
driver loaded another configuration then.
16 July 2009, Version 1.1.2:
- Support for SolidEdge added.
15 June 2009, Version 1.1.1:
- Some applications (e. g. Siemens NX ®) were unable to execute the user functions recorded with the Function Editor described above. It works now.
- The parameter "rememberLastCfg" in the daemon.ini file did not work properly.
- Autodesk Inventor versions prior to Inventor 2008 will work without plug-in if the parameter "allowInventor" in the file "daemon.ini" is set to "on" (cap movement only, no mode detection, no integration of menu functions into the Key Configuration dialog). For Inventor 2009 and later this parameter must be set to "off".
- There is nearly no delay any longer in object movement when changing a configuration.
- Under certain conditions it could happen that sending data
from the device after changing a configuration stopped,
because the "Send Delay" parameter in the Advanced Settings dialog switched to
405 ms (= data sending off). This is fixed.
- Minor bug-fixes.
5 April 2009, Version 1.1.0:
- After a power resume it could happen that the driver must be
restarted to work properly again. This is fixed.
- Minor bug-fixes.
17 March 2009, Version 1.0.1:
- First published release.
8 Known Bugs
- If the SpaceControl Panel
is started from "within" the driver (i. e. by double
click on the tray icon or by pressing the PANEL key on the
device) and the driver is stopped and restarted again it may
happen that the SpaceControl
Panel and all other applications or plug-ins are not
able any longer to establish a connection to the driver. The SpaceControl Panel must
be closed to cure this.
To avoid this you can start the SpaceControl Panel with the entry in your Windows start menu.
- Under certain conditions it may still happen that the SpaceControl Panel's sliders and other control elements flicker if the in-built cube demo tab is open. The menus are not usable in this state. See the entry in the troubleshooting section.
- Awakening from power resume seems not to work reliably in
all cases. Unfortunately we cannot improve this because the
driver of the USB chip in our device is responsible for the
misbehaviour.
9 Trademarks
Autodesk Inventor® is a registered trademark of Autodesk, Inc., in the USA and other countriesGoogle Earth® is a trademark of Google Inc.
Linux® is the registered trademark of Linus Torvalds in the U.S. and other countries.
Microsoft®, Windows® and Internet Explorer® are registered trademarks of Microsoft Corporation in the United States and/or other countries.
Pro/ENGINEER® is a registered trademark of Parametric Technology Corporation or its subsidiaries in the U.S. and in other countries.
Siemens NX® is a registered trademark of Siemens Product Lifecycle Management Software Inc. or its subsidiaries in the United States and in other countries.
Solid Edge ® is a trademark or registered trademark of Siemens Product Lifecycle Management Software Inc. or its subsidiaries in the United States and in other countries.
| |
Author: Friedemann Seebass Copyright © SpaceControl GmbH & Co. KG, Am Technologiepark 10, 82229 Seefeld, Germany |