Technical Notes on MNU Files


Contents


1 Supported Applications

1.1 Introduction

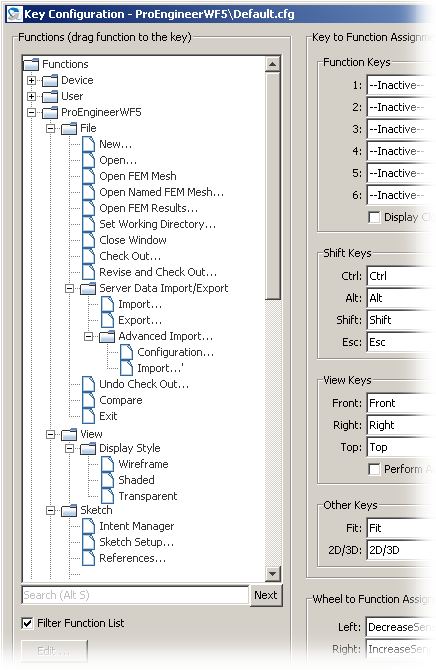
To allow easy mapping of your application's menu items to the SpaceController's keys the menu items are displayed in the Function Assignment dialog. They are located in a special branch of the Functions area on the dialog's left side and can be dragged to a key on the right side.

The menu item list comes into the dialog by means of a so called MNU file, a file with the extension ".mnu". It is located in "C:\Users\<user name>\SpaceController\Applications\" (under Windows XP the folder "Users" is replaced by "Documents and Settings") and is created by the plug-in when it is started the first time ("Supported Applications" are those for which we have a plug-in).
How does the plug-in know what to put into the file? Well, it asks the application! The quality of what you find in the file depends on the answer the application gives, and that differs a lot from application to application; unfortunately some commands may not work as expected or some items are completely missing . But luckily you can edit the file by yourself if it does not fit your needs. How this can be done is described here.

1.2 Structure of MNU Files

Let's look at a short excerpt of Pro/ENGINEER's MNU file (deletions are marked with lines containing only "..."):

# Pro/Engineer menubar file

[Modes]
Sketcher                                 = 1
Part                                     = 2
Sheet_Metal                              = 3
Composite                                = 4
Scan_Model                               = 5
Assembly                                 = 6
Drawing                                  = 7
Manufacture                              = 8
Mold                                     = 9
Cast                                     = 10
Dieface                                  = 11
Layout                                   = 12
Format                                   = 13
Report                                   = 14
Markup                                   = 15
Diagram                                  = 16
Interchange                              = 17
Legacy                                   = 18
User_Defined                             = 19
Verify                                   = 20
Process                                  = 21
Nc_Model                                 = 22
Default                                  = 23

[MenuBar]
0File                                    = {}
1New...                                  = {}ProCmdModelNew|Create a new object
1Open...                                 = {}ProCmdModelOpen|Open an existing object
1Open FEM Mesh                           = {}ProCmdFemMeshRead|Retrieve FEM Mesh
1Open Named FEM Mesh...                  = {}ProCmdFemMeshNamedRead|Retrieve FEM Mesh from file
1Open FEM Results...                     = {}ProCmdFemResultsRead|Retrieve FEM Results from file
1Set Working Directory...                = {}ProCmdSessionChangeDir|Change to another working directory
1Close Window                            = {}ProCmdWinCloseGroup|Close window and keep object in session
1Check Out...                            = {}ProCmdMdlTreeWfEdit|Check out the Cad Document of the active object
1Revise and Check Out...                 = {}ProCmdWfRevise|Revise and Check out the Cad Document
1Server Data Import/Export              
2Import...                               = {}ProCmdUtilImport|Import files to data server
2Export...                               = {}ProCmdUtilExport|Export files from data server
2Advanced Import...                     
3Configuration...                        = {}ProCmdUtilAdvConfig|Import configuration
3Import...                               = {}ProCmdUtilAdvImport|Import files to data server using control file
1Undo Check Out...                       = {}ProCmdMdlTreeWfEditCancel|Undo Check Out of object in active window
...
1Compare                                 = {+ 7}ProCmdDwgCompare|Highlight changes between two drawings.
...
1Exit                                    = {}ProCmdExit|Exit Pro/Engineer
...
0View                                    = {}
...
1Display Style                          
2Wireframe                               = {}ProCmdEnvMdlDisp*Wireframe|
Displays the object in wireframe mode
2Shaded                                  = {}ProCmdEnvMdlDisp*Shading|Displays the object in shaded mode
...
0Sketch                                  = {- 2 6 15 23}
1Intent Manager                          = {+ 1}ProCmdSketToggleIntentMng|Toggle dynamic dimensioning mode
1Sketch Setup...                         = {+ 1}ProCmdSketSetup|Specify sketch setup.
1References...                           = {+ 1}ProCmdSketReferences|Specify references.
...

As you can see there are two sections in the file:
The first section lists all the [Modes] available in an application. ProE has many modes, well known are the part mode (no. 2) or the assembly mode (no. 6) e. g.; other applications may have only two entries here, e. g. 2D mode and 3D mode only.
The second section should contain all entries of your application's [MenuBar] and/or other user interface elements.
The first section should not be edited, the second can be modified easily if you adhere to the syntax described here.
ATTENTION: There is no elaborate syntax check when reading in the file. Make sure to fulfill the requirements exactly.

1.3 Structure of MenuBar lines

Each line in section [MenuBar] describes a menu item in your application, containing basically the item name and the command that it executes in your application. The parts of a line are:
<submenuNumber><menuItemName>"="<filter><command>["|"<comment>]

Let us describe the parts in detail:
With the information given above you should be able to edit the menu file and to incorporate additional commands into the Function Assignment dialog's menu structure. In principle you can add new entries at any position in the file. But, if you have configured your SpaceController's keys already be aware that the driver sends only an index (i. e. the line number in the MNU file) in case of a key press to the plug-in (the plug-in extracts the command and sends it to your application). New entries in the MNU file (after saving a key configuration) will add an offset to that index, and the key press will execute another command! So, new entries should be made at the end of the file or before assigning functions to a key.

2 Other Applications

2.1 Introduction

From driver version 2.4.2 on you can use MNU files for all applications, not only the supported ones we have developed a plug-in for. With these MNU files you can trigger arbitrary key sequences (macros) and all the built-in SpaceControl functions in the "Devices" branch of the Function Assignment dialog.
Since there is no plug-in reading out the menu items and creating the MNU file for you, you have to do this by hand. This means you have to create the MNU file with an arbitrary text editor; Microsoft's Notepad is sufficient.
Be aware: This feature is not meant for the common audience but for system administrators who know what they do. There is no elaborate syntax check in the driver. An incorrect syntax in the MNU file may cause the driver to crash!

The benefits when using your own MNU files are:
As an example we will create an MNU file for Notepad in the following sections.

2.2 Recording the Macros

The first step when creating your own MNU file is to record the macros you want to have in the file. This is done as described in section 3.3.3.2 of the user manual. In this example we want to have 1) a macro for creating a new file in Notepad and 2) a second one for switching word wrapping on and off. Inspecting Notepad's GUI we see that 1) the key sequence "Ctrl+n" opens a new file and 2) "Alt+o+w" switches word wrapping on and off. Record these two key sequences with the SpaceController's Function Editor, name the first one "New File" and the second one "Wordwrap on/off" for example and save the configuration into an arbitrary file, say, "tmp.cfg".

2.3 Creating the MNU File

Your MNU file must have exactly the structure described above. I. e. both the sections [Modes] and [MenuBar] must occur, and the lines must look as shown. It will be much shorter of course. In our example the minimal MNU file is the following:

# Notepad menu file

[Modes]
Default            = 1

[MenuBar]
0New File          =
{}21114e64e711|Opens a new file
0Wordwrap on/off   =
{}21214f64f157657712|Switches wordwrapping on and off

The [Modes] section is not used, and one line with an arbitrary mode is sufficient. Let us repeat the needed stucture of a line in the [MenuBar] section:

When the file is edited save it into the folder "C:\Users\<Username>\SpaceController\Applications\". Its name must be the same as the application's binary. The binary for Notepad is "notepad.exe", so the correct name for the MNU file is "notepad.mnu".

2.4 Using the MNU file

If the MNU file's name corresponds with the application's binary name and the file is stored in the correct folder the driver will load the file as soon as Notepad comes into the foreground. You will find its entries in the Function Assignment dialog, and you can drag the commands to the SpaceController's keys or the Wheel Function Launcher as usual.


SpaceControl Author: Friedemann Seebass
Copyright © SpaceControl GmbH, Am Technologiepark 10, 82229 Seefeld, Germany