Blender Plug-in
Readme
Contents
1 Plug-in
Description
This plug-in ("add-on" in Blender's notation) enables you to move
the scene and objects in Blender with the SpaceControl 3D input
devices. Furthermore it incorporates Blender's operators in the
SpaceControl Panel's Function
Assignment dialog for easy mapping to the device's
function keys.
Blender versions from 2.71 on are supported.
2 Installing and
Starting the Plug-in
The plug-in is a single file "spacecontrol.py" and must be placed in
Blender's add-ons folder. Its location varies with the operating
system; our installer tries to find it and to copy the file
automatically. If this does not work you have to copy the plug-in by
hand from our driver's installation folder. The locations are
usually as listed in the following table:
Operating System\Location
|
SpaceControl Blender Plug-in
|
Blender's Add-ons Folder |
Windows
|
"C:\Program Files
(x86)\SpaceControl\Blender\spacecontrol.py" |
"C:\Program Files\Blender
Foundation\Blender\<version>\scripts\addons\" |
Linux (Debian)
|
"/opt/SpaceControl/Blender/spacecontrol.py" |
"/usr/lib/blender/scripts/addons" |
Linux (Ubuntu)
|
"/opt/SpaceControl/Blender/spacecontrol.py" |
"/usr/share/blender/scripts/addons" |
OS X/macOS
|
"/Applications/SpaceControl/Blender/spacecontrol.py" |
"/Applications/Blender/blender.app/Contents/Resources/<version>/scripts/addons/" |
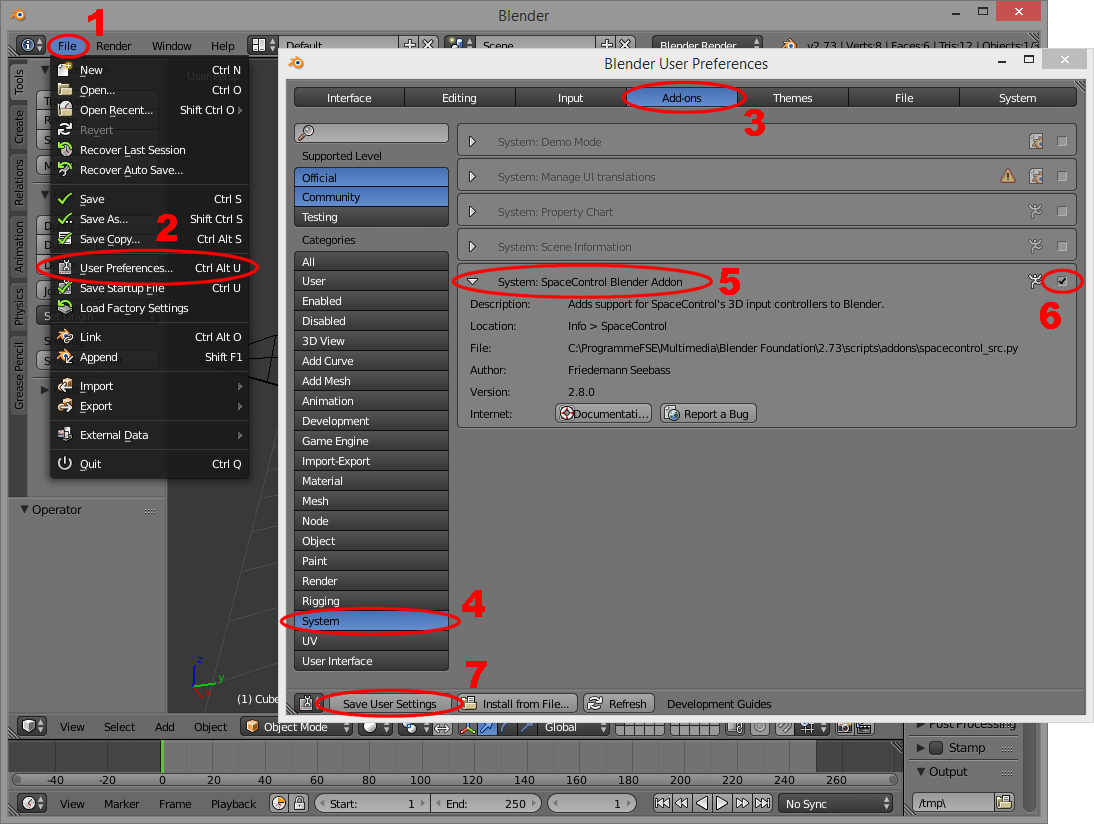
To start the plug-in click on Blender's "File" menu (1), open the
User Preferences dialog (2), go to the tabulator "Add-ons" (3) and
into the category "System" (4). You will find the "SpaceControl
Blender Addon" there (5), activate it with the checkmark (6):
When the add-on is checked it is started, and a "SpaceControl" menu
is added to Blender's Info header. If you want the add-on to be
started automatically when Blender starts push the "Save User
Settings" button (7) in the preferences dialog while the add-on is
checked.
3 SpaceControl
Menu
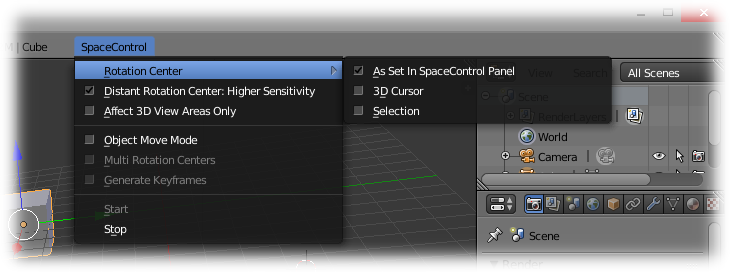
The add-on provides Blender with its own "SpaceControl" menu in the
Info header:

- Rotation Center
This is a submenu for setting the rotation center:
- As Set In SpaceControl Panel: This setting leaves
the rotation center as it is set in the SpaceControl panel's
Advanced Configuration dialog. See the driver's manual for
details. In Blender's orthographic mode the mode Camera
Mode: Rotate around Camera will not quite do what one
will expect due to mathematical restrictions.
- 3D Cursor: If activated the scene in Blender
rotates around Blender's 3D cursor.
- Selection: If activated the scene rotates around
your selected object's origin. If more than one object is
selected the common midpoint of all selected object origins
is used.
- Distant Rotation Center: Higher Sensitivity
This item changes the characteristic the data from the device is
interpreted. If unchecked the data is sent linearly into
Blender; if checked the data is a little modified: When the
virtual camera is near the rotation center the speed is slowed
down, but increased in larger distances.
- Affect 3D View Areas Only
Normally you can zoom and pan in Blender's 2D areas with the
controller, e. g. in the Timeline or the Graph Editor. If this
menu item is activated the controller is disabled in all of
Blender's editors with the exception of the areas containing a
3D View.
- Object Move Mode
If activated you do not move Blender's scene but the
selected objects in the scene. See the hints concerning cameras
below. To make this state visible at the first glance an "O" is
appended at the menu's name ("SpaceControl-O").
If Blender is not in Object mode the selected sub elements
(vertices in meshes, points in curves, bones in armatures etc.)
are moved. But there is one exception: Blender's API does not
allow to retrieve selected sub metaballs in a metaball object;
therefore only the last selected metaball can be moved and not
the whole selection; and rotation is not possible in this case.
It is not possible to move selections in 2D areas (UV Editor
etc.) yet.
- Multi Rotation Centers
This item is available only if Object Move Mode is
activated. It changes the behaviour in case more than one object
is selected; normally all selected objects rotate around their
common midpoint. If this item is selected all selected objects
rotate synchronously around their own origins.
- Generate Keyframes
If activated the add-on creates keyframes automatically. The
following conditions must be fulfilled additionally:
- Object Move Mode must be selected.
- Blender's "Automatic keyframe insertion" must be activated
(i. e. the red dot in the Timeline header must be pressed).
- A "keying set" (e. g. "LocRot") must be selected in the
Timeline.
- Start
Starts the add-on again if stopped.
- Stop
Stops the add-on. This may be useful if you want to reload all
add-ons with F8 because this won't work while the SpaceControl
add-on is running.
4 Hints
4.1 Configurations
The add-on is aware of Blender's screen layout selected in the
Info header and sends its name to the SpaceControl driver. The
driver tries to load a configuration file with the same name as
the layout's name automatically. You are able to have different
configurations for each screen layout in this way. Together with
the driver come configuration files for Blender's default screen
layouts ("3D View Full.cfg", "Animation.cfg", "Compositing.cfg",
"Default.cfg", ...). They are all empty and ready to be filled by
the user. Only the "Default.cfg" configuration file we have
populated with some macros and settings for the device's keys and
the Wheel Function Launcher. Try out if this fits your
needs. To copy these settings into another configuration just
click in the SpaceControl panel on menu item "File/Save
Configuration As ..." and store the file "Default.cfg" under the
appropriate name, e. g. "3D View Full.cfg". Do the same for your
own named screen layouts.
4.2 Operators
Unfortunately it is not possible to read out Blender's menu items
as we liked to do to offer them in our Function
Assignment dialog for easy mapping them to the
controller's keys and the Wheel Function Launcher. Instead
the add-on reads out all so called operators defined in Blender.
Blender shows you the name of an operator called by a menu item
when you let rest your mouse pointer over the item. Example: Menu
item "Add/Mesh/Cube" in the 3D View header calls operator
"bpy.ops.mesh.privitive_cube_add()". And this can easily be found
in our Function Assignment dialog.
When mapped to a key you are able to trigger an operator in
contexts it is not made for. This can produce unexpected results.
Some operators need parameters to be given which is not possible
by our mechanism; these operators cannot be used in a meaningful
way. (In some cases it could help to edit the file "blender.mnu";
see the Technical Notes on MNU
Files for details.)
To avoid problems concerning the context an operator is triggered
in it is a good alternative to use Blender's keyboard shortcuts;
record them as macros with our little macro recorder and assign
these macros to the device's keys. We have used this approach in
the "Default.cfg" file delivered with the driver mentioned above.
4.3 Cameras
If the view is in Camera Perspective (numpad 0 in Blender) you
can move it neither with the device nor with the normal mouse.
This is only possible if you select the camera first and switches
the add-on into Object Move Mode (see chapter 3). In this
way you can position your camera much more comfortable than with
the normal mouse. If you have more than one 3D view open be aware
in which region your mouse pointer is: The behaviour is very
different if it is in a Camera Perspective region or a User
Perspective region because the movement is always relative to the
screen coordinates of the active region.
4.4 Getting the 3D
Controller's Data in Blender's Game Engine
It is possible to use the 3D controller's data to move your
objects in Blender's Game Engine by means of a Blender Python
controller. The minimal script for moving Blender's default cube
is this:
#-------------------------------------------------------------------------------
import bge
# import the global plug-in data object:
from spacecontrol import gBlenderPlugin
# choose the device to get data from (always 0 if only one device
is connected):
devIdx = 0
# just as a shortcut:
data = gBlenderPlugin.devDataList[devIdx]
# get the device's data:
x =
data.x # translation in x direction
y =
data.y # translation in y direction
z =
data.z # translation in z direction
a =
data.a # rotation around x axis
b =
data.b # rotation around y axis
c =
data.c # rotation around z axis
event = data.event # pressed keys and other events
tvSec = data.tvSec # timestamp, seconds
tvUsec = data.tvUsec # timestamp, microseconds
print(x, y, z, a, b, c, event, tvSec, tvUsec)
# get the sample scenes controller and actuator:
controller = bge.logic.getCurrentController()
motionActuator = controller.actuators["Motion"]
# move the cube:
motionActuator.dLoc = [ x/1000, -z/1000, y/1000 ]
motionActuator.dRot = [ a/1000, -c/1000, b/1000 ]
controller.activate(motionActuator)
#-------------------------------------------------------------------------------
I. e. you have to import the global gBlenderPlugin
object of our Blender plug-in to get access to the 3D controller's
raw data, and you can access the translation data coordinates x,
y, z and the rotational coordinates a, b, c around these axes.
Scale the data as you need it (divisor 1000 in the above example).
See the sample file "<SpaceControl installation
folder>\Blender\sc_sample.blend" how to assign the script to a
demo cube's logic bricks.
4.5 Using Several
Devices Concurrently
From version 2.8.9 on the plug-in supports using of more
SpaceControl devices than just one. It is possible to bind a
selected object or a group of objects to a device, and the device
will move and rotate these objects exclusively then. Bind a
spotlight to another device, a camera to a third, and you can have
three persons to be in the role of an actor, an illuminator and a
cameraman by handling their Blender objects with their individual
SpaceControl devices concurrently!
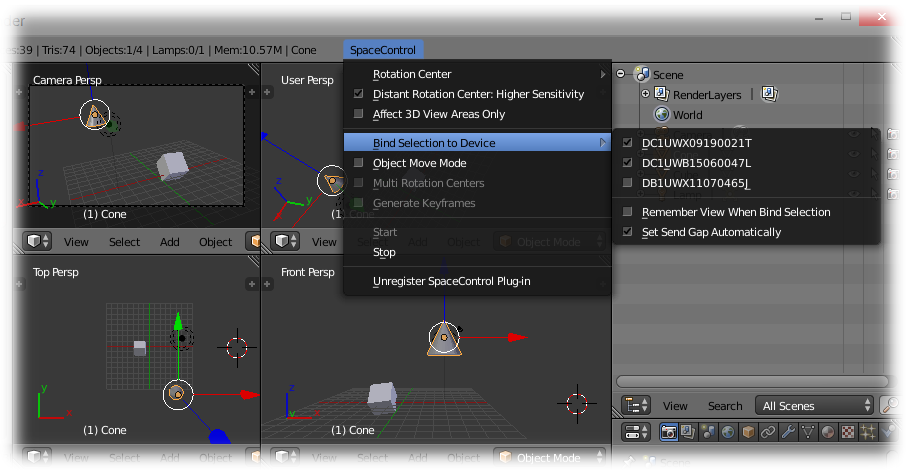
If more than one device is connected the SpaceControl menu
described above changes a little; there is a new submenu Bind
Selection to Device which basically contains the
serial numbers of all connected devices (three in this example):
Binding a Blender object to a device is easy: Just select the
wanted object in Blender and press the menu item with the
appropriate serial number in the menu. From now on the device
moves and rotates the object(s) in the selection - even if the
selection is deselected. To free the object(s) press the menu item
again. Whether objects are bound to a device or not is signaled by
the menu item's check box.
If the cameraman e. g. controls the camera view with his device
it is sometimes difficult for the other actors to move their
objects in the same view because the SpaceControl devices' axes
are oriented relative to the screen and not to the virtual world
showed in the scene, and the other actors are permanently forced
to rethink their position when the cameraman rotates the camera.
Therefore it is recommended to split the view to allow each actor
to have its own to concentrate on. But this would not help so much
because a bound object is still moved relative to the screen
coordinates, but in fact to that view the mouse pointer is over
currently. That is where menu item Remember View When Bind
Selection comes into play: If the item is activated
the plug-in remembers the currently active view (i. e. the view
with the last device-controlled movement in it) when the selection
is bound and will not change it even if the mouse pointer is moved
to another view. Try out the difference with some split views as
shown above.
Attention: Blender's Quad View is only one view, not four views as
needed by our mechanism; you have to create real split views to
get the menu item working.
If more than three devices are connected you may observe a slight
performance decrease which results in a time lag when moving the
scene or an object because the data is buffered and delivered even
after a device's cap is released. To avoid this it is necessary to
reduce the devices' data rate. This can be achieved by increasing
the devices' Send Gap in the SpaceControl Panel's
Advanced Configuration dialog (activate the check box Further
Settings there to see the Send Gap slider; see
section 3.3.2
in the user manual for details).
Increasing the Send Gap by hand for each device is
inconvenient; therefore the plug-in can do this for you by itself
when menu item Set Send Gap Automatically is
activated. In this case, as soon as a change in the number of
connected devices is detected, the plug-in measures the data rate
of the first new few data packets for each device and adjusts the
Send Gap appropriately to avoid the time lag.
5 Known Issues
- You cannot reload Blender's add-ons with F8 while our Blender
add-on is running. If this is needed stop the add-on temporarily
and restart it afterwards.
- Blender's second window (Ctrl-Alt-W) cannot be controlled with
the 3D mouse.
- Nested armatures and child objects of bones will not move as
expected in object move mode.
- If the add-on crashes (of course this never happens) Blender
possibly cannot be stopped completely even if the main window is
closed. You have to kill the process ("blender.exe",
"blender-app.exe", "blender", "Blender", dependant on the
operating system or Blender version) in this case.
- The performance decreases a little when connecting more than
three devices.
6 Change Log
30 July 2018, Version 2.9.2:
- A little inconsistency (Linux and macOS only) in the installer
- when executed directly in the installation folder itself - is
fixed.
4 April 2018, Version 2.9.1:
- In our Object Move Mode you can move the selected sub
elements now even if Blender is not in Object Mode: Move the
vertices in meshes, the points in curves, bones in armatures
etc.
- To make it more clear that Object Move Mode is active
the SpaceControl menu has an "O" appended in this case.
- Because some comments in Blender's operator descriptions
contain new-line characters the plug-in made some mistakes when
creating our so called MNU file.
- The parameter Set Send Gap Automatically described in
section 4.5 above is not activated by default any longer because
this mechanism could lead to a higher send gap than necessary
even with only a single connected device.
4 October 2017, Version 2.8.9:
- The plug-in is able to reconnect with the driver automatically
even if the driver has been stopped and restarted.
- The plug-in is aware of more than one connected device;
Blender objects can be bound to a device for moving them
individually.
ATTENTION: The interface for using the controller in Blender's
Game Engine has changed slightly therefore. To access the
device's data you have to use statements like
x = gBlenderPlugin.devDataList[0].x
instead of
x = gBlenderPlugin.x
now.
13 March 2017, Version 2.8.7:
- The "Default.cfg" configuration is modified due to the double
pressing feature introduced in the last version. Double clicking
the device's CTRL, ALT or SHIFT keys simulates pressing the "x",
"y" or "z" keyboard keys e. g.
- Shift+Space sets Blender in the non-normal mode. To avoid
loading the "common.cfg" configuration in this case a set
of "...-nonnormal.cfg" configurations is added.
- The plug-in is unchanged otherwise.
22 November 2016, Version 2.8.6:
- The plug-in is aware of the new device functions "Back",
"Left" and "Bottom". By default you can trigger them by double
pressing the device keys FRONT, RIGHT and TOP.
- After triggering the "Fit" function the rotation center is now
the middle of the visible objects, not the middle of all objects
in the scene (better if some objects are placed in not visible
layers).
- The plug-in crashed when using the device in the "Graph" or
"Dopesheet" subwindows of the Movie Clip Editor. Movement is
still not possible but the crash is fixed.
23 February 2016, Version 2.8.3:
- Moving an object (see Object Move Mode above) has crashed the
plug-in if no screen layout named "Scene" was there.
17 November 2015, Version 2.8.2:
- Pressing the device's FIT button within an empty scene has
crashed the plug-in.
- Pressing the device's FIT button has not reset the
sensitivity; this could result in a big jump of the scene when
touching the cap even only slightly in case menu item "Distant
Rotation Center: Higher Sensitivity" has been active.
- Some minor bug-fixes.
15 July 2015, Version 2.8.1:
- After pressing the SpaceController's FIT button the rotation
center was often placed far out of sight because it kept its
location in world coordinates. In consequence even slight
rotations resulted in very large movements of the scene. The
rotation center is set into the middle of all objects in the
scene now when the FIT button is pressed.
- When refreshing Blender files in the development environment
of the game engine Unity the refresh failed as soon as our
"spacecontrol.py" file has been placed into Blender's add-ons
directory.
19 March 2015, Version 2.8.0:
- First published release. (The version number comes from the
driver version the plug-in is included the first time.)
SpaceControl GmbH & Co.
KG, Am Technologiepark 10, 82229 Seefeld, Germany


